Building Pybites Search in Rust

"The only way to learn a new programming language is by writing programs in it."

  • Dennis Ritchie

So true! Hence after my morning reading I picked up the laptop and tried to re-build Pybites search in Rust :)

I came up with the following, iterating over code and learning Rust with ChatGPT (repo here).

Note that I first consolidated 5 endpoints (articles, bites, videos, podcasts and tips) on our platform to one endpoint, so I only had to do a single request.

The Rust script

use cached::proc_macro::cached;
use reqwest;
use serde::Deserialize;
use regex::Regex;
use std::env;
use std::time::Duration;

const TIMEOUT: u64 = 10;
const ENDPOINT: &str = "http://localhost:8000/api/content";

#[derive(Deserialize, Debug, Clone)]
struct Item {
    content_type: String,
    title: String,
    summary: String,
    link: String,
}

#[tokio::main]
async fn main() -> Result<(), Box<dyn std::error::Error>> {
    let args: Vec<String> = env::args().collect();
    if args.len() < 2 || args.len() > 4 {
        eprintln!("Usage: search <search_term> [<content_type>] [--title-only]");
        return Ok(());
    }

    let search_term = &args[1];
    let content_type = if args.len() >= 3 && !args[2].starts_with("--") { Some(&args[2]) } else { None };
    let title_only = args.contains(&"--title-only".to_string());

    let items = match fetch_items(ENDPOINT.to_string()).await {
        Ok(items) => items,
        Err(e) => {
            eprintln!("Error fetching items: {:?}", e);
            return Err(e.into());
        }
    };

    search_items(&items, search_term, content_type.map(String::as_str), title_only);

    Ok(())
}

#[cached(time = 600, result = true, sync_writes = true)]
async fn fetch_items(endpoint: String) -> Result<Vec<Item>, Box<dyn std::error::Error>> {
    let client = reqwest::Client::new();
    let response = client
        .get(&endpoint)
        .timeout(Duration::from_secs(TIMEOUT))
        .send()
        .await?
        .error_for_status()? // Ensure the response status is a success
        .json::<Vec<Item>>()
        .await?;
    Ok(response)
}

fn search_items(items: &[Item], search_term: &str, content_type: Option<&str>, title_only: bool) {
    let re = Regex::new(&format!("(?i){}", regex::escape(search_term))).unwrap();

    for item in items {
        let matches = if title_only {
            re.is_match(&item.title)
        } else {
            re.is_match(&item.title) || re.is_match(&item.summary)
        };
        if content_type.map_or(true, |t| t.eq_ignore_ascii_case(&item.content_type)) && matches {
            if content_type.is_none() {
                println!("Type: {}", item.content_type);
            }
            println!("Title: {}", item.title);
            println!("Link: {}\n", item.link);
        }
    }
}

Note this is AI generated code so it might not be as idiomatic as it could be. But that doesn't matter, I can always refactor it later. The point is I got a working script in Rust that searches our content. 🦀

Plus I feel I learned a lot in the process, a lot faster by just consuming tutorials and reading books! 💡

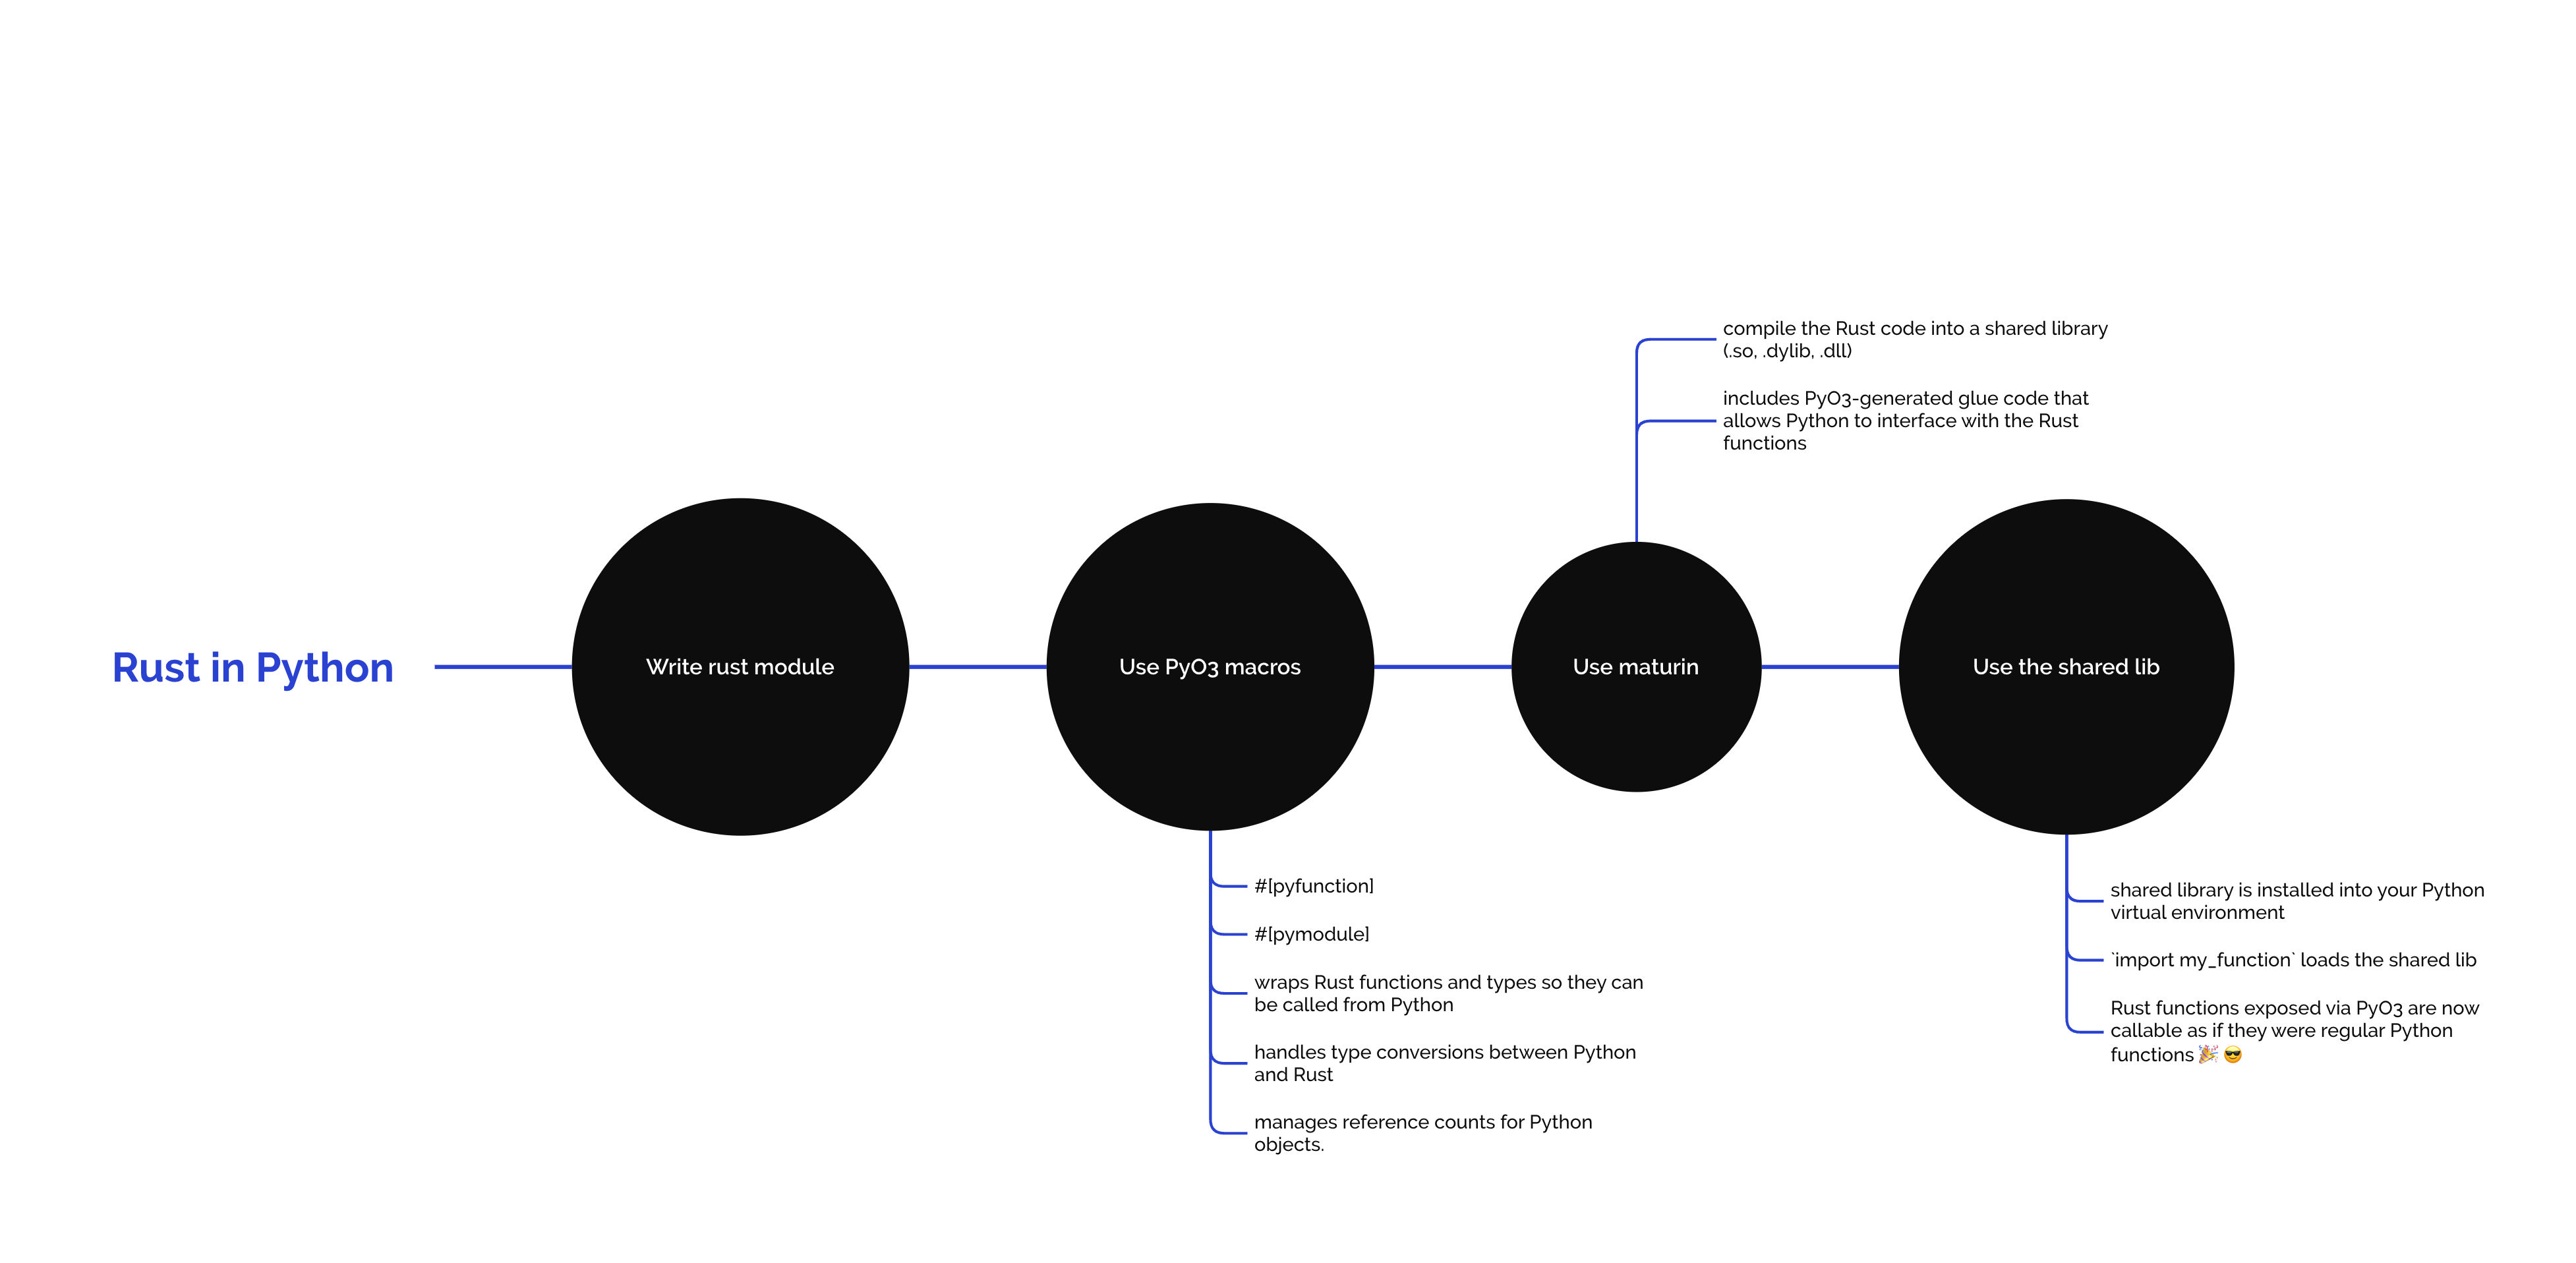
Some things I learned

  • How to make requests with reqwest (and tokio for async requests)
  • How to cache requests with cached (note that this is a simple in-memory cache so it turned out to not be that useful for this script, in a later revision I added manual memoization, see this post)
  • How to use serde to deserialize JSON
  • Handle command line arguments
  • Use regex to search for a term in a string
  • Print to stdout and stderr
  • Method chaining in Rust
  • Some error handling in Rust
  • Simple things like how to best define constants

Config

$ cat Cargo.toml
[package]
name = "pybites-search"
version = "0.1.0"
authors = ["Bob Belderbos <bob@pybit.es>"]
edition = "2021"
description = "A command-line search tool for Pybites content"
license = "MIT"

[dependencies]
cached = "0.34.0"
reqwest = { version = "0.11", features = ["json"] }
tokio = { version = "1", features = ["full"] }
serde = { version = "1", features = ["derive"] }
serde_json = "1"
regex = "1"

[[bin]]
name = "psearch"
path = "src/main.rs"
  • There is some metadata at the top about the package.
  • Below I listed the dependencies I used in the script.
  • I also defined the binary name and path to the script, that's why you see me running ./target/release/psearch below aafter the build step.

Compiling and running the script

 search (main) $ cargo build --release
...
...

 search (main) $ ./target/release/psearch
Usage: search <search_term> [<content_type>] [--title-only]

 search (main) $ ./target/release/psearch rust
Type: article
Title: Jim Hodapp on coaching software engineers and the power of Rust
Link: https://pybit.es/articles/jim-hodapp-on-coaching-software-engineers-and-the-power-of-rust/

Type: article
Title: Talking to API's and goodlooking tools
Link: https://pybit.es/articles/guest-talking-to-apis-goodlooking-tools

Type: bite
Title: Create Wikipedia Lorem Ipsum text
Link: http://localhost:8000/bites/364

...
...

√ search (main) $ ./target/release/psearch rust article
Title: Jim Hodapp on coaching software engineers and the power of Rust
Link: https://pybit.es/articles/jim-hodapp-on-coaching-software-engineers-and-the-power-of-rust/

Title: Talking to API's and goodlooking tools
Link: https://pybit.es/articles/guest-talking-to-apis-goodlooking-tools

...
...

 search (main) $ ./target/release/psearch rust  --title-only
Type: article
Title: Jim Hodapp on coaching software engineers and the power of Rust
Link: https://pybit.es/articles/jim-hodapp-on-coaching-software-engineers-and-the-power-of-rust/

Type: video
Title: Pybites Podcast 146 - Armin Ronacher: Flask 3.0, Open Source, Rust and Developer Mindset
Link: https://www.youtube.com/watch?v=yV4OXDy_DwE

Type: video
Title: Pybites Podcast 105 - Jim Hodapp on coaching software engineers and the power of Rust
Link: https://www.youtube.com/watch?v=LojYjASdOHk

Type: podcast
Title: #146 - Armin Ronacher: Flask 3.0, Open Source, Rust and Developer Mindset
Link: https://www.pybitespodcast.com/14165010/14165010-146-armin-ronacher-flask-3-0-open-source-rust-and-developer-mindset

Type: podcast
Title: #105 - Jim Hodapp on coaching software engineers and the power of Rust
Link: https://www.pybitespodcast.com/12368334/12368334-105-jim-hodapp-on-coaching-software-engineers-and-the-power-of-rust

 search (main) $ ./target/release/psearch rust video --title-only
Title: Pybites Podcast 146 - Armin Ronacher: Flask 3.0, Open Source, Rust and Developer Mindset
Link: https://www.youtube.com/watch?v=yV4OXDy_DwE

Title: Pybites Podcast 105 - Jim Hodapp on coaching software engineers and the power of Rust
Link: https://www.youtube.com/watch?v=LojYjASdOHk

TIL we DO have some Rust content on Pybites! 🦀 😎

Next steps:

  • Deploy the new endpoint on our platform and have the script point to it
  • Add some tests
  • Deploy it to crates.io
  • Automate the deployment with GitHub Actions (upon pushing a new tag)
  • New features (as per your feedback ...)

Practice, Practice, Practice 🦀 - work on projects you care about 📈

A note about this type of learning: I find it very effective to learn a new language by (re-)building something you already know and/or you're passionate about.

You have to practice! It's a lot like language learning. You can't just read a book and expect to be fluent. You have to practice speaking and listening.

This is exactly what I did when I was interrailing around Europe in my early 20s and wanted to become more fluent in French and Spanish. I would speak to locals, watch TV, and read newspapers. I completely immersed myself in the language. And I made a lot of mistakes. That's how you learn!

The same is true for programming. Yes, you need to read the docs and books to grasp fundamentals, but above all you need to get into the trenches and write a lot of code, ideally in the context of building real-world projects. It's where things start to click and you start to see the bigger picture. It's also way more fun!


If you enjoy this content hit me up on X. I'm always up for a chat about programming. I also coach developers, so if you need help with your coding journey let me now, I can help you with this. 🚀

How to run Rust in Python with PyO3 and Maturin

In this article I will show you how to run Rust code in Python using PyO3 + Maturin.

PyO3 is a Rust library for building Python bindings and Maturin is a tool for building and publishing Python packages built with PyO3.

Here is a quick overview of the steps we will follow:

overview mind map of how PyO3 and Maturin work to run Rust code in Python

Let's do a quick demo to see how it works.

Create a new library

First, let's create a new Rust library using Cargo:

cargo new --lib sum_squares

This will create a new directory called sum_squares with the following structure:

 pyo3  $ tree
.
└── sum_squares
    ├── Cargo.toml
    └── src
        └── lib.rs

3 directories, 2 files

Next we update the Cargo.toml file to include the pyo3 dependency:

[package]
name = "sum_squares"
version = "0.1.0"
edition = "2021"

[lib]
name = "sum_squares"
crate-type = ["cdylib"]

[dependencies]
pyo3 = { version = "0.21", features = ["extension-module"] }

We also need the cdylib crate type to create a shared library that can be loaded by Python (so/.dylib/.dll files, .so for Unix, .dll for Windows).

Next, we update the src/lib.rs file to include a simple function that sums the squares of two numbers:

use pyo3::prelude::*;

#[pyfunction]
fn sum_of_squares(n: u64) -> u64 {
    (1..=n).map(|x| x * x).sum()
}

#[pymodule]
fn sum_squares(_py: Python, m: &PyModule) -> PyResult<()> {
    m.add_function(wrap_pyfunction!(sum_of_squares, m)?)?;
    Ok(())
}

At a high level:

  • The #[pyfunction] attribute is used to mark the function as a Python function.
  • The #[pymodule] attribute is used to mark the module as a Python module.
  • The m.add_function method is used to add the sum_of_squares function to the module.
  • The wrap_pyfunction! macro is used to wrap the Rust function in a Python function.
  • The Python and PyModule types are used to interact with the Python runtime.

Some Rust syntax I am learning about:

  • We use the use statement to import the pyo3::prelude module, which contains common types and traits used in PyO3.
  • The sum_of_squares function calculates the sum of squares of numbers from 1 to n using the ..= operator (= is including the upper bound) to create a range and the map and sum methods to calculate the sum of squares,
  • The function receives a single argument n of type u64 and returns a single value of type u64. Unlike Python's optional type hints, Rust's type hints are mandatory.
  • The PyResult in the sum_squares function signature is the return type of functions that can return errors. This is needed because the add_function method can return an error. The ? operator is used to propagate the error if it occurs.
  • The Ok(()) expression is used to return a successful result. () is the unit type, which is similar to void in other languages.

Create a Python package

First make a virtual environment, enable it, and install the maturin package:

python -m venv venv
source venv/bin/activate
pip install maturin

Normally you would run maturin init to create a new Python package, but in this case we already have a Cargo project, so we can skip this step.

Let's build the Python package using Maturin:

maturin develop

It worked but I did get this warning:

warning: use of deprecated method `pyo3::deprecations::GilRefs::<T>::function_arg`: use `&Bound<'_, T>` instead for this function argument

To fix this error, I updated the function signature to use &Bound<'_, PyModule> instead of &PyModule:

...
fn sum_squares(m: &Bound<'_, PyModule>) -> PyResult<()> {
...

After that change, I ran maturin develop again and the warning was gone:

$ maturin develop

🔗 Found pyo3 bindings
🐍 Found CPython 3.11 at /Users/bbelderbos/code/rust/pyo3/sum_squares/venv/bin/python
    Finished `dev` profile [unoptimized + debuginfo] target(s) in 0.07s
📦 Built wheel for CPython 3.11 to /var/folders/jl/cfhvw0nj11n1496hk7vqhw_r0000gn/T/.tmp5qSsw8/sum_squares-0.1.0-cp311-cp311-macosx_10_12_x86_64.whl
✏️  Setting installed package as editable
🛠 Installed sum_squares-0.1.0

I can now see the shared library (.so file) in my virtual environment:

$ ls -lrth venv/lib/python3.11/site-packages/sum_squares
total 1936
-rw-r--r--@ 1 bbelderbos  staff   127B Jun  4 12:59 __init__.py
-rwxr-xr-x@ 1 bbelderbos  staff   961K Jun  4 12:59 sum_squares.cpython-311-darwin.so
drwxr-xr-x@ 3 bbelderbos  staff    96B Jun  4 12:59 __pycache__

And I can import it in the Python REPL:

>>> import sum_squares
>>> sum_squares.sum_of_squares(5)
55

That's it! We have successfully built a Python package with Rust code using PyO3 and Maturin.

I have not pushed one to PyPI, but you can do that by running maturin publish. I will blog here when I have done that for a real project ...

Lastly, to see how it performs vs some Python code, I created a test.py file:

import time

from sum_squares import sum_of_squares


def sum_of_squares_py(n):
    return sum(x * x for x in range(1, n + 1))


if __name__ == "__main__":
    n = 10**6

    start_time = time.time()
    result = sum_of_squares_py(n)
    end_time = time.time()
    print(f"Python result: {result}")
    print(f"Python execution time: {end_time - start_time:.6f} seconds")

    start_time = time.time()
    result = sum_of_squares(n)
    end_time = time.time()
    print(f"Rust result: {result}")
    print(f"Rust execution time: {end_time - start_time:.6f} seconds")

Running it:

$ python test.py
Python result: 333333833333500000
Python execution time: 0.066308 seconds
Rust result: 333333833333500000
Rust execution time: 0.023685 seconds

Nice, the Rust implementation is about 3x faster than the Python implementation. But that's not the point of this article, the point is to show you how to run Rust code in Python which opens up exciting new opportunities for performance improvements in your Python code. 😍 📈

This is how Pydantic, the data validation library, is speeding up its codebase I believe. 😎

Conclusion

In this article, we learned how to run Rust code in Python using PyO3 and Maturin. We created a new Rust library with a simple function that sums the squares of two numbers, built a Python package using Maturin, and tested the performance of the Rust implementation against a Python implementation.

There is a lot more to learn about PyO3 and Maturin, and Rust in general.

Check out the PyO3 documentation and the Maturin documentation for more information.

What Python code do you want to speed up with Rust?

Rust Cargo is a lot like Python Poetry 😍

When you start working in Rust, you'll quickly learn about Cargo and love it!

It's a package manager and build system that helps you manage your Rust projects.

Coming from Python, I found it very similar to Poetry, which is a great tool as well).

Features

  • Dependency management: Cargo.toml
  • Virtual environments: Cargo.toml and Cargo.lock
  • Lock files: Cargo.lock
  • Build system: cargo build, cargo run, cargo test, cargo doc
  • Publishing to crates.io: cargo publish

Cargo vs Poetry Commands Cheat Sheet

Here's a quick comparison of some common commands in Cargo and Poetry. Notice how similar they are! 😎

ActionCargo CommandPoetry Command
Initialize a projectcargo new project_namepoetry new project_name
Initialize in current dircargo initpoetry init
Add a dependencycargo add dependency_namepoetry add dependency_name
Remove a dependencycargo remove dependency_namepoetry remove dependency_name
Update dependenciescargo updatepoetry update
List dependenciescargo treepoetry show --tree
Build the projectcargo buildpoetry build
Run the projectcargo runpoetry run python your_script.py
Run testscargo testpoetry run pytest (requires pytest)
Generate documentationcargo docNot built-in, use a tool liked Sphinx
Build release binarycargo build --releasepoetry build (for packaging)
Run release binarycargo run --releaseNot directly supported
Format codecargo fmtpoetry run black . (requires black)
Lint codecargo clippypoetry run flake8 . (requires flake8)

One cool thing I noticed is that generating docs and testing is built-in in Cargo, while in Python you need to use external tools like Sphinx and pytest.

Conclusion

If you love Poetry, you'll love Cargo too! They are both great tools for managing your projects and dependencies.

Funny enough, in Python I actually stopped using poetry in favor of venv and pip because I felt this was faster and all I needed. But in Rust so far I feel Cargo is more integrated and I am using it more (well, don't have much choice, have I? 😅).

I think it's mainly because I don't have to deal with virtual environments in Rust, which is a big plus. Also it infers the binary name from the project name, which is nice. 📈

This post was just to quickly compare Cargo and Poetry and show you how similar they are. I hope you found it helpful! 😊

I am sure I will do more in-depth posts on Cargo in the future. Stay tuned! 🚀

How to blog with Zola, a Rust-based static site generator

Here is how I am running this blog using Zola.

What is Zola?

Zola is a static site generator (SSG), similar to Hugo, Pelican, and Jekyll (for a comprehensive list of SSGs, please see Jamstack). It is written in Rust and uses the Tera template engine, which is similar to Jinja2, Django templates, Liquid, and Twig. source

Installation

brew install zola  # cargo would not work for me
zola init .  # I had a repo, else: zola init myblog
# follow the instructions
# add a theme (https://www.getzola.org/themes/)
git submodule add https://github.com/pawroman/zola-theme-terminimal themes/terminimal
zola create post "My First Post"

Maybe something more but these were the main steps.

Configuration

This is my config.toml:

base_url = "https://apythonistalearningrust.com"
title = "A Pythonista Learning Rust"
description = "Documenting the journey of a Pythonista learning Rust with bite-sized posts."
theme = "terminimal"
compile_sass = true
build_search_index = false
generate_feed = true
feed_filename = "atom.xml"

[markdown]
highlight_code = true

[extra]
logo_text = "A Pythonista Learning Rust"
logo_home_link = "/"
author = "Bob Belderbos"

# Whether to show links to earlier and later posts
# on each post page (defaults to true).
enable_post_view_navigation = true

# The text shown at the bottom of a post,
# before earlier/later post links.
# Defaults to "Thanks for reading! Read other posts?"
post_view_navigation_prompt = "Read more"

# - "combined" -- combine like so: "page_title | main_title",
#                 or if page_title is not defined or empty, fall back to `main_title`
page_titles = "combined"
  • base_url is important for the theme to work correctly (I forgot to update https://example.com at the start and it broke the theme's styling)
  • theme is the name of the theme folder in themes/
  • compile_sass - Sass compilation is required (see theme docs)
  • the settings under [extra] are theme specific.

Writing

For each new post, you create a new markdown file in the content folder. The file name should be the title of the post with dashes instead of spaces.

The file should start with a TOML front matter block, which is the metadata for the post. Here is an example:

+++
title = "How to set up Zola"
date = 2024-06-02
+++

If you want to add more metadata, you can add it in this front matter block. If you don't want to publish the post yet, you can add draft = true for example.

Then write the content in markdown beneath this block.

To make a new post I made a quick shell script:

$ cat new_post.sh
#!/bin/bash

# Prompt for the slug and title
read -p "Enter the slug (e.g., my-new-post): " slug
read -p "Enter the title: " title

# Get today's date
date=$(date +"%Y-%m-%d")

# Define the file path
file_path="content/${slug}.md"

# Create the new markdown file with front matter
cat <<EOL > $file_path
+++
title = "${title}"
date = ${date}
+++

EOL

echo "New post created at $file_path"

Building

zola build

This will generate the static site in the public folder.

Then run a local server to preview the site:

zola serve

For convenience I made a Makefile with some aliases including a combined dev command:

.PHONY: build serve dev clean checkout-theme

build:
	zola build

serve:
	zola serve

dev:
	zola build && zola serve

clean:
	rm -rf public

checkout-theme:
	git submodule update --init

checkout-theme I added later when I git clone'd this repo on a new machine and detected that the theme repo was not cloned automatically.

Deployment

I use GitHub Actions to build and deploy the site (so nice!)

Here is the workflow file (.github/workflows/deploy.yml):

# On every push this script is executed
on: push
name: Build and deploy GH Pages
jobs:
  build:
    runs-on: ubuntu-latest
    if: github.ref == 'refs/heads/main'
    steps:
      - name: Checkout main
        uses: actions/checkout@v4
      - name: Build and deploy
        uses: shalzz/zola-deploy-action@v0.18.0
        env:
          PAGES_BRANCH: gh-pages
          GITHUB_TOKEN: ${{ secrets.GITHUB_TOKEN }}

This workflow will build the site and push the changes to the gh-pages branch upon every push to the main branch.

  • Interestingly ChatGPT overcomplicated this, but I found in Zola's docs that you can actually use shalzz/zola-deploy-action. I only had to update from 0.17.x to 0.18.x to make it work.

  • You don't have to setup the secrets.GITHUB_TOKEN as it is a default secret provided by GitHub if you use your action for the same repository.

  • I did have to update the "Workflow permissions" under GitHub's repo Settings > Actions, to enable "Read and write permissions" (Workflows have read and write permissions in the repository for all scopes.), otherwise the action would fail.

  • I also had to set "Build and deployment" to "Deploy form a branch" (under Settings > Pages) and set the branch to gh-pages + / (root).

Static files

I did hit one issue when showing images in the post.

I thought this would work:

![overview mind map of how PyO3 and Maturin work to run Rust code in Python](/rust-in-python.png)

Having the image in my static/ folder, but it didn't show up on the live site.

I played with the path making it relative and absolute, but in the end, I had to use the image() shortcode with the src attribute pointing to the image in the static/ folder (just the file name, not the full path). See theme docs as well.

Add pages

This was a bit less straight-forward so I am adding it here as an extra. See commit:

  • I created a menu_items array in the config.toml with the pages I wanted to add to the menu.
  • I created a content/pages folder and added a markdown file for each page using existing templates from the theme (about and archive).
  • I also made an content/pages/_index.md, I cannot 100% remember but I think it would not compile without it.
  • I could move the post entries to a new content/posts folder (and use the content/posts/_index.md to list the posts), but I decided to keep them in the root content folder for now.

OK that seems easier than it was, but I had to try a few things to get it right. 😅

You can enable search in the theme by setting build_search_index = true in the config.toml. This will generate search_index.json and elasticlunr.min.js files in the public folder upon build.

elasticlunr.js is a lightweight full-text search engine in JavaScript for browser search. The search index is generated from the content of the site upon build, the index is stored in mentioned search_index.json file.

Here is the commit I made to get search working on this site:

  • I created a templates/search.html file with the search form and results.

  • It contains the necessary JavaScript to make this work. First we define an idx constant: const idx = elasticlunr.Index.load(window.searchIndex); which we can then use to search the index (idx.search(query)). It returns an array of search results which we then render in the DOM.

  • I added some CSS to style the search results and added the page to the navigation menu with {name = "Search", url = "$BASE_URL/pages/search"}, in the config.toml.

doing a search on this website another search

Add a custom domain

Apart from mentioned base_url in the config.toml, you also need to add a CNAME file in the static/ folder with the domain you want to use, e.g.:

$ cat static/CNAME
apythonistalearningrust.com

Then under the repo's Settings > GitHub Pages, you can add the custom domain. You can also turn on HTTPS there.

Lastly you need to update your DNS settings of your domain provider to point to GitHub's IP addresses, see GitHub's docs.

Conclusion

Zola is a great SSG so far, I am happy with the setup. I like the simplicity of the tool and the speed of the generated site (Rust 📈 -> zola build -> Done in 91ms. for me) and automatic deployment with GitHub Actions. 😍

If you're looking for a Rust based SSG solution I hope this post will help you with the setup. 📈

Hello World

Welcome to my first blog post on A Pythonista Learning Rust where I'll share my journey of learning Rust as a Python developer.

Why Rust?

I've been a Python developer for a while now, and I love the language. However, I've been hearing a lot about Rust lately and wanted to explore it further. Rust is known for its performance, safety, and concurrency support, things I have not learned much about so far and are fascinating.

Popular projects in the Python space that leverage Rust include Pydantic and Ruff. We recently had Samuel Colvin (creator of Pydantic) on our Pybites podcast and at Pycon 2024 I saw Charlie Marsh talk about how Rust makes Ruff so fast. This inspired me to dive into Rust.

Learning Rust

As per our Pybites motto you have to build projects and share your learning to get the most benefit, hence this blog.

Of course I will heavily use AI tools, most notably Co-Pilot and ChatGPT to help me learn and write Rust code. I will also share how this process goes ...

And lastly shout-out to Jim Hodapp who has a community called Rust Never Sleeps. When learning new skills it's important to join a community and his is very welcoming and helpful. For Python I recommend you join us on Circle.

Tools for this blog

To keep it Rust I use Zola to generate this blog. It's a static site generator written in Rust. The nice dark theme you're seeing here is Terminimal which goes well with my love for the terminal.

I will do another post how I set this up with GitHub Actions to deploy it to GitHub Pages.

I am looking forward to learning a lot of Rust and see how I can speed up some Python with it.

Even if I keep doing most of my coding in Python, I expect that learning Rust will make me a better programmer.