Writing a Rust code validation API

Today I managed to add support for Rust exercises on our platform. I struggled with getting cargo test to work on AWS Lambda for a week (talking about tunnel vision), so it was time to pivot to a different approach.

It turns out that I needed a bit more resource power and Heroku did it for me. So I dropped AWS Gateway API + AWS Lambda (what we normally use to validate coding exercises) and wrote my first Rust API to run tests on code.

The final version is a bit more involved, because it gets the code from our platform's API. To keep it simple, I omitted this part here.

Using Axtix-web to build an API

Here is the code:

use actix_web::{web, App, HttpRequest, HttpResponse, HttpServer, Responder};
use serde::{Deserialize, Serialize};
use std::env;
use std::fs;
use std::io::Write;
use std::process::Command;
use tempfile::tempdir;

#[derive(Deserialize)]
struct Request {
    user_code: String,
    test_code: String,
}

#[derive(Serialize)]
struct Response {
    success: bool,
    output: String,
}

async fn execute_code(req: web::Json<Request>, http_req: HttpRequest) -> impl Responder {
    let api_key = env::var("API_KEY").expect("API_KEY not set");

    if let Some(key) = http_req.headers().get("x-api-key") {
        if key.to_str().unwrap_or("") != api_key {
            return HttpResponse::Unauthorized().body("Invalid API key");
        }
    } else {
        return HttpResponse::Unauthorized().body("Missing API key");
    }

    let user_code = &req.user_code;
    let test_code = &req.test_code;

    let dir = tempdir().unwrap();
    let dir_path = dir.path();

    let main_path = dir_path.join("src/main.rs");
    fs::create_dir_all(main_path.parent().unwrap()).unwrap();
    let mut main_file = fs::File::create(&main_path).unwrap();
    main_file
        .write_all(
            format!(
                r#"
            {}

            #[cfg(test)]
            mod tests {{
                use super::*;
                {}
            }}
            "#,
                user_code, test_code
            )
            .as_bytes(),
        )
        .unwrap();

    let cargo_toml_path = dir_path.join("Cargo.toml");
    let mut cargo_toml_file = fs::File::create(cargo_toml_path).unwrap();
    cargo_toml_file
        .write_all(
            br#"
        [package]
        name = "temp_project"
        version = "0.1.0"
        edition = "2021"

        [dependencies]
        "#,
        )
        .unwrap();

    let output = Command::new("cargo")
        .arg("test")
        .current_dir(dir_path)
        .output()
        .expect("failed to execute cargo test");

    let success = output.status.success();
    let output_str = String::from_utf8_lossy(&output.stdout).to_string()
        + String::from_utf8_lossy(&output.stderr).as_ref();

    dir.close().unwrap();

    let response = Response {
        success,
        output: output_str,
    };

    HttpResponse::Ok().json(response)
}

#[actix_web::main]
async fn main() -> std::io::Result<()> {
    HttpServer::new(|| App::new().route("/execute", web::post().to(execute_code)))
        .bind("0.0.0.0:8080")?
        .run()
        .await
}

Dependencies used (in Cargo.toml):

[dependencies]
actix-web = "4.0.0"
serde = { version = "1.0", features = ["derive"] }
serde_json = "1.0"
tempfile = "3.2"

Some highlights:

  • Request and Response are the structs for the request and response bodies.

  • Making an API is relatively simple with the actix-web crate. The main function starts an HTTP server that listens on port 8080. I did have to make the port configurable with an environment variable for Heroku, but I omitted this part from the code for this post.

  • execute_code is the handler for the /execute endpoint. It receives the code and tests, writes them to a temporary file, and runs cargo test on it. For this to work, the code and tests are concatenated into a single file and we write a Cargo.toml file with the base metadata.

  • The code is written to a temporary directory using the tempfile crate.

  • To make it a bit more secure, I added an API key check. If the API key is missing or invalid, the API returns an unauthorized response.

Here is the repo if you want to play with it yourself.

Testing the API

As you can see in the README I added two test examples of a good vs failing test:

$ ./test-ok.sh abc
{"success":true,"output":"\nrunning 1 test\ntest tests::test_add ... ok\n\ntest result: ok. 1 passed; 0 failed; 0 ignored; 0 measured; 0 filtered out; finished in 0.00s\n\n   Compiling temp_project v0.1.0 (/private/var/folders/jl/cfhvw0nj11n1496hk7vqhw_r0000gn/T/.tmp1Y5KyV)\n    Finished `test` profile [unoptimized + debuginfo] target(s) in 0.29s\n     Running unittests src/main.rs (target/debug/deps/temp_project-b55de88e432be2f2)\n"}%

$ ./test-fail.sh abc
{"success":false,"output":"\nrunning 1 test\ntest tests::test_add ... FAILED\n\nfailures:\n\n---- tests::test_add stdout ----\nthread 'tests::test_add' panicked at src/main.rs:7:41:\nassertion `left == right` failed\n  left: -1\n right: 5\nnote: run with `RUST_BACKTRACE=1` environment variable to display a backtrace\n\n\nfailures:\n    tests::test_add\n\ntest result: FAILED. 0 passed; 1 failed; 0 ignored; 0 measured; 0 filtered out; finished in 0.00s\n\n   Compiling temp_project v0.1.0 (/private/var/folders/jl/cfhvw0nj11n1496hk7vqhw_r0000gn/T/.tmpKXOHmY)\n    Finished `test` profile [unoptimized + debuginfo] target(s) in 0.27s\n     Running unittests src/main.rs (target/debug/deps/temp_project-b55de88e432be2f2)\nerror: test failed, to rerun pass `--bin temp_project`\n"}%

Conclusion

As a nice side effect of wanting to support Rust exercises on our platform, I learned how to build a simple API in Rust.

As mentioned I deployed it to Heroku, for which I had to use Docker to build the image, and then push it to Heroku's container registry. I will detail that in a follow up post ...
Exception handling in Rust

I am working on an AWS Lambda function to validate Rust code submitted from our coding platform. It led to some exception handling code, which I found interesting to compare with Python.

Adding exception to running an external command

Here is an example of exception handling I added to my lambda function to run a cargo command in a temporary directory. The function returns the output of the command if it is successful, or an error message if it fails:

async fn run_cargo_command(temp_dir_path: &Path) -> Result<Output, String> {
    match Command::new("cargo")
        .arg("test")
        .arg("--verbose")
        .current_dir(temp_dir_path)
        .output()
        .await
    {
        Ok(output) => {
            if output.status.success() {
                Ok(output)
            } else {
                Err(format!(
                    "Command executed with errors: {}",
                    String::from_utf8_lossy(&output.stderr)
                ))
            }
        }
        Err(e) => Err(format!(
            "Failed to execute command: {}. Is 'cargo' installed and accessible in your PATH?",
            e
        )),
    }
}

Here is the equivalent code in Python:

import subprocess

def run_cargo_command(temp_dir_path):
    try:
        output = subprocess.run(
            ["cargo", "test", "--verbose"],
            cwd=temp_dir_path,
            capture_output=True,
            check=True,
        )
        return output
    except subprocess.CalledProcessError as e:
        raise Exception(f"Command executed with errors: {e.stderr}")
    except FileNotFoundError as e:
        raise Exception(
            "Failed to execute command: Is 'cargo' installed and accessible in your PATH?"
        )

Rust and Python Error Handling Comparison

  • In Rust, we use the Result type (Ok/Err) to represent success or failure, while in Python, we use exceptions.

  • Rust requires explicit handling of both success and failure cases, while Python allows for more flexible error handling.

  • Rust's error handling is enforced at compile time, while Python's error handling is checked at runtime.

  • Rust's pattern matching allows for concise and clear error handling, while Python's exception handling requires less boilerplate, it's more flexible, but can also lead to more runtime errors (because they are detected later).

  • In Python you have to specifically catch the FileNotFoundError exception (and fall back to a generic Exception), while in Rust, it is handled by the Err case of the match statement which could include any error that occurs during the execution of the command.

Conclusion

Python's exception handling allows for rapid and flexible development, making it easier to write code quickly. However, this same flexibility can lead to more runtime errors because errors are often detected later (at runtime) and it's easier to overlook proper error handling.

Rust, on the other hand, enforces more rigorous error handling at compile time, leading to more reliable and predictable code, though it can be more verbose and require more upfront effort.

This is just a small example, when I get into more nuances of error handling in Rust, I will follow up with a more detailed post. I also understand there are some common crates you can use like anyhow to make error handling in Rust more concise and flexible. To be continued ...

Automating test runs and checking coverage

The other day I did a post on testing in Rust and the next logical step is to automate test runs and check coverage. Here's how you can do that:

  1. Automating test runs using GitHub Actions

This is quite easy to do with a workflow file that runs the tests on every push and pull request. Here's an example:

# .github/workflows/tests.yml
name: Rust

on: [push, pull_request]

jobs:
  test:
    runs-on: ubuntu-latest

    steps:
    - uses: actions/checkout@v2

    - name: Set up Rust
      uses: actions-rs/toolchain@v1
      with:
        toolchain: stable
        override: true

    - name: Cache Cargo registry
      uses: actions/cache@v2
      with:
        path: ~/.cargo/registry
        key: ${{ runner.os }}-cargo-registry-${{ hashFiles('**/Cargo.lock') }}
        restore-keys: |
          ${{ runner.os }}-cargo-registry-

    - name: Cache Cargo index
      uses: actions/cache@v2
      with:
        path: ~/.cargo/git
        key: ${{ runner.os }}-cargo-index-${{ hashFiles('**/Cargo.lock') }}
        restore-keys: |
          ${{ runner.os }}-cargo-index-

    - name: Cache Cargo build
      uses: actions/cache@v2
      with:
        path: target
        key: ${{ runner.os }}-cargo-build-${{ hashFiles('**/Cargo.lock') }}
        restore-keys: |
          ${{ runner.os }}-cargo-build-

    - name: Run tests
      run: cargo test --verbose

Example job

  1. Checking test coverage using tarpaulin

I was wondering if there was an equivalent to pytest-cov in Rust and I found tarpaulin. First install it:

cargo install cargo-tarpaulin

Then run it:

$ cargo install cargo-tarpaulin
2024-07-03T11:29:24.739505Z  INFO cargo_tarpaulin::process_handling: running /Users/bbelderbos/code/rust/cli_alarm/target/debug/deps/alarm-556e1e717eaa9b33
2024-07-03T11:29:24.739591Z  INFO cargo_tarpaulin::process_handling: Setting LLVM_PROFILE_FILE

running 4 tests
test tests::test_edge_cases ... ok
test tests::test_exact_minute_durations ... ok
test tests::test_minute_and_second_durations ... ok
test tests::test_short_durations ... ok

test result: ok. 4 passed; 0 failed; 0 ignored; 0 measured; 0 filtered out; finished in 0.00s

2024-07-03T11:29:25.052962Z  INFO cargo_tarpaulin::statemachine::instrumented: For binary: target/debug/deps/alarm-556e1e717eaa9b33
2024-07-03T11:29:25.052976Z  INFO cargo_tarpaulin::statemachine::instrumented: Generated: target/tarpaulin/profraws/alarm-556e1e717eaa9b33_14793736282992077593_0-7692.profraw
2024-07-03T11:29:25.052979Z  INFO cargo_tarpaulin::statemachine::instrumented: Merging coverage reports
2024-07-03T11:29:25.056944Z  INFO cargo_tarpaulin::statemachine::instrumented: Mapping coverage data to source
2024-07-03T11:29:25.083725Z  INFO cargo_tarpaulin::report: Coverage Results:
|| Uncovered Lines:
|| src/main.rs: 55, 57-58, 62, 64, 68-69, 73, 75, 78-79, 91-92, 94, 97-98, 100-101, 104-105
|| Tested/Total Lines:
|| src/main.rs: 12/32
||
37.50% coverage, 12/32 lines covered

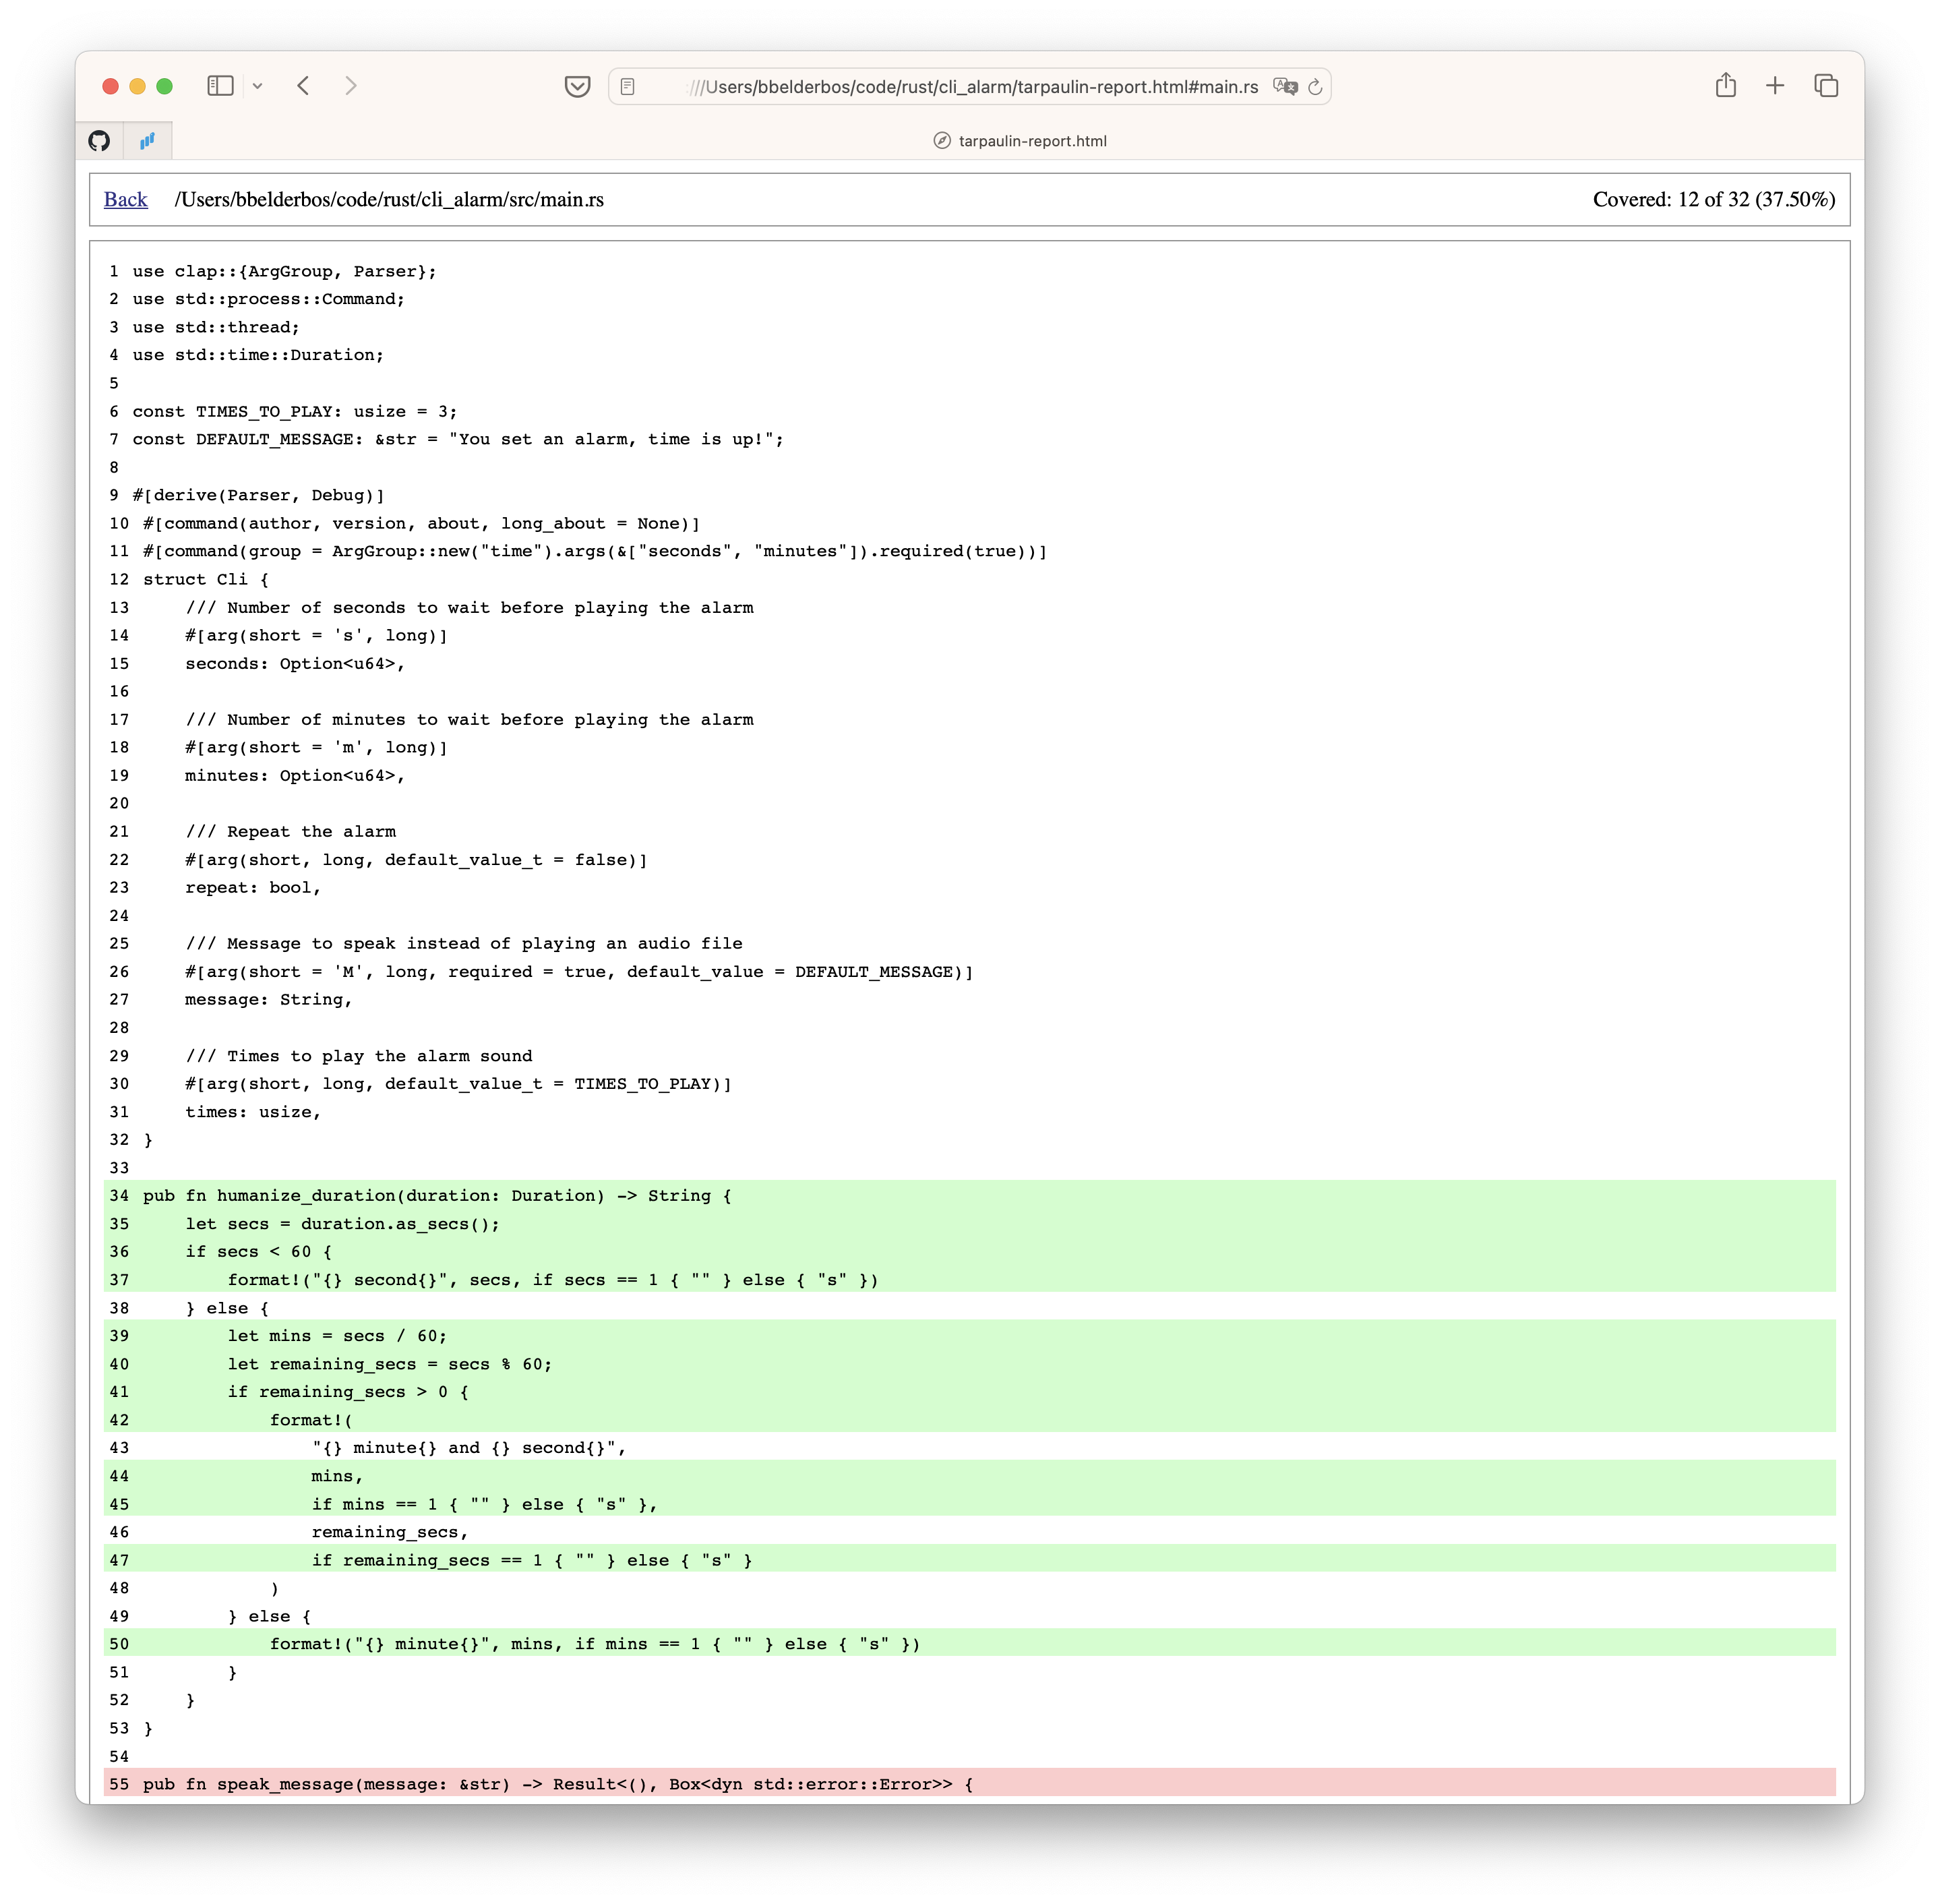
And to make it more visual, generate an HTML report (the equivalent of pytest --cov --cov-report=html):

$ cargo tarpaulin --out Html

Beautiful:

example test report tarpaulin makes

There you go, two more tools to help you test your Rust code.

How to write unit tests in Rust

In Python you can use unittest (Standard Library) or pytest (PyPI) to write tests. In Rust, you can use the #[cfg(test)] and #[test] attributes to write tests. Let's explore how ...

Writing a test

To get some boilerplace code, make a library project with cargo new mylib --lib and you get this:

√ rust  $ cargo new --lib testproject
    Creating library `testproject` package
note: see more `Cargo.toml` keys and their definitions at https://doc.rust-lang.org/cargo/reference/manifest.html
√ rust  $ cat testproject/src/lib.rs
pub fn add(left: usize, right: usize) -> usize {
    left + right
}

#[cfg(test)]
mod tests {
    use super::*;

    #[test]
    fn it_works() {
        let result = add(2, 2);
        assert_eq!(result, 4);
    }
}
  • #[cfg(test)] is a conditional compilation attribute that tells the compiler to only compile the module when running tests.

  • mod tests is a module that contains all the tests.

  • use super::*; imports all the functions from the parent module.

  • #[test] is an attribute that tells the compiler that the function is a test, you prepend it to each test function.

  • assert_eq! is a macro that checks if the two arguments are equal.

That's it. Now you can run cargo test to run the tests. If you want to run a specific test, you can run cargo test it_works (similar to pytest -k).

Writing some tests for my CLI alarm project

This both a good and bad project to demo this. Bad because it uses system audio which is hard to test. Good because it's a simple project and has one function I am interested in testing for this article.

Here is the code:

...
...
pub fn humanize_duration(duration: Duration) -> String {
    let secs = duration.as_secs();
    if secs < 60 {
        format!("{} second{}", secs, if secs == 1 { "" } else { "s" })
    } else {
        let mins = secs / 60;
        let remaining_secs = secs % 60;
        if remaining_secs > 0 {
            format!(
                "{} minute{} and {} second{}",
                mins,
                if mins == 1 { "" } else { "s" },
                remaining_secs,
                if remaining_secs == 1 { "" } else { "s" }
            )
        } else {
            format!("{} minute{}", mins, if mins == 1 { "" } else { "s" })
        }
    }
}
...
...

Copying above boilerplace over I got to write these tests:

#[cfg(test)]
mod tests {
    use super::*;
    use std::time::Duration;

    #[test]
    fn test_short_durations() {
        assert_eq!(humanize_duration(Duration::from_secs(0)), "0 seconds");
        assert_eq!(humanize_duration(Duration::from_secs(1)), "1 second");
        assert_eq!(humanize_duration(Duration::from_secs(30)), "30 seconds");
    }

    #[test]
    fn test_exact_minute_durations() {
        assert_eq!(humanize_duration(Duration::from_secs(60)), "1 minute");
        assert_eq!(humanize_duration(Duration::from_secs(180)), "3 minutes");
        assert_eq!(humanize_duration(Duration::from_secs(3600)), "60 minutes");
    }

    #[test]
    fn test_minute_and_second_durations() {
        assert_eq!(
            humanize_duration(Duration::from_secs(61)),
            "1 minute and 1 second"
        );
        assert_eq!(
            humanize_duration(Duration::from_secs(122)),
            "2 minutes and 2 seconds"
        );
        assert_eq!(
            humanize_duration(Duration::from_secs(333)),
            "5 minutes and 33 seconds"
        );
    }

    #[test]
    fn test_edge_cases() {
        assert_eq!(humanize_duration(Duration::from_secs(59)), "59 seconds");
        assert_eq!(
            humanize_duration(Duration::from_secs(119)),
            "1 minute and 59 seconds"
        );
        assert_eq!(
            humanize_duration(Duration::from_secs(3599)),
            "59 minutes and 59 seconds"
        );
    }
}

I could have grouped them all into one test, but I wanted:

  • To show how you can write multiple tests.
  • To have better naming for each test for readability and targeting.

On the other hand having a test function for each test would be way too verbose.

Unfortunately there is no parametrize feature in Rust like in pytest, so this was my "workaround" for now.

Running cargo test I get:

$ cargo test
...
running 4 tests
test tests::test_minute_and_second_durations ... ok
test tests::test_edge_cases ... ok
test tests::test_exact_minute_durations ... ok
test tests::test_short_durations ... ok

test result: ok. 4 passed; 0 failed; 0 ignored; 0 measured; 0 filtered out; finished in 0.00s

$ cargo test edge_ca
...
running 1 test
test tests::test_edge_cases ... ok

test result: ok. 1 passed; 0 failed; 0 ignored; 0 measured; 3 filtered out; finished in 0.00s

Unittest vs integration tests

This has been an example of a unit test: a test that tests a single piece of code, often a single function.

You can also write integration tests in Rust. Integration tests are tests that test the interaction between multiple modules or components.

You can write integration tests in a tests directory, I will show here when I cross that bridge ...

Conclusion

The #[cfg(test)] attribute is a conditional compilation attribute that instructs the Rust compiler to only compile the annotated module when running tests.

Within this module, the #[test] attribute is used to mark functions as tests, and the assert_eq! macro is employed to check if two values are equal.

It is common practice to bundle unit tests within the same module as the code being tested. Integration tests, however, are typically placed in a dedicated module within the tests directory.

Rust does not have a built-in parametrize feature like pytest. To manage multiple test cases, you can either write individual test functions for each case or group similar tests within a few functions to improve naming and targeting options.

From script to library in Rust

In Rust you can write a script or a library. Turning your code into the latter is useful when you want to reuse the code in the script in other projects.

Compare it to a script vs a package in Python. In Python you can write a script and then turn it into a package by adding an __init__.py file. In Rust you can write a script and then turn it into a library by moving the code into a library project. Let's see how to do this ...

Writing a script

Let's start by writing the simplest script that prints a greeting to the console. And a main function that calls the hello function with a name:

Create a new project called project:

cargo new project

And edit the src/main.rs file to contain the following code:

fn main() {
    hello("Alice");
}

fn hello(name: &str) {
    println!("Hello, {}!", name);
}

This script defines a hello function that takes a name as an argument and prints a greeting to the console. The main function calls the hello function with the name "Alice" (no command line arguments, this is for example's sake).

Turning the script into a library

To turn the script into a library, we need to create a new library project and move the code from the script into the library. We can do this by running the following commands:

cargo new --lib my_library
mv project/src/main.rs my_library/src/lib.rs

The --lib flag tells Cargo to create a library project instead of a binary project.

This will create a new library project called my_library and move the code from the script into the library. The lib.rs file is the entry point for the library, and it contains the code that will be executed when the library is used.

Using the library

To use the library in the first project, we need to add it as a dependency in the Cargo.toml file of the project. We can do this by adding the following line to the Cargo.toml file of the project:

[dependencies]
my_library = { path = "../my_library" }

Normally you would list one or more crates from crates.io in the dependencies section, but in this case we are using a relative path to the library project.

We can now use the library in the project by importing it and calling the hello function. Create main.rs again (it was previously moved to the library) under src in the project and add the following code to it:

use my_library;

fn main() {
    my_library::hello("Tim");
}

The path works, because ALE complains about the next thing:

src/main.rs|4 col 17-21 error| E0603: function `hello` is private private function

Rust makes functions private by default. So back in the library I need to make the function public explicitly by adding pub in front of it in lib.rs:

pub fn hello(name: &str) {
    println!("Hello, {}!", name);
}

And then it works:

$ cargo run -q
warning: function `main` is never used
 --> /Users/pybob/code/rust/lib-example/my_library/src/lib.rs:1:4
  |
1 | fn main() {
  |    ^^^^
  |
  = note: `#[warn(dead_code)]` on by default

Hello, Tim!

I do get this warning that the main function in the library is never used, which makes sense, because unlike a binary project, the library is not an executable. Therefor I can remove the main function from the library, no more warnings:

$ cargo run -q
Hello, Tim!

Similar to Python where you can do import pathlib as well as from pathlib import Path, you can do the same in Rust. You can import the whole library with use my_library; or just the hello function with use my_library::hello;.

use my_library::hello;

fn main() {
    hello("Tim");
}

And that'll work equally well.

Sometimes people opt for the first option, because it's more explicit where the function comes from (my_library::hello vs hello). But in this case it's a bit overkill, because there's only one function in the library.

Conclusion

We learned how to make a library as opposed to a script (binary) in Rust (which is what I have mostly done up until this point). This is useful when you want to reuse the code in the script in other projects.

We also learned how to use the library in another project and the fact that Rust makes module functions private by default (another example where it's more strict than Python!)

This is a good thing because it forces you to think about what you want to expose to the outside world.

We also learned about the two ways to import functions from a library: importing the whole library or just the function you need. And lastly the fact that libraries don't have a main function, because they are not executables.

Now you know how to write libraries in Rust so you can write code that is easier to reuse and maintain. 😍 🎉 📈