How to deploy a Rust app to Heroku

In yesterday's post, I showed how to build a simple web application with Rust. Today, I'll show how to deploy this application to Heroku.

Steps

  1. Add a Procfile to the root of your project

For a simple web application, the Procfile should contain the following line, assuming artist_portfolio is the name of the application:

web: ./target/release/artist_portfolio

Note that we don't need to run a web server like Gunicorn, because the Rust application is self-contained.

No other files are needed, because the Rust buildpack (see below) will take care of the rest based on the Cargo.toml file.

  1. Create a new Heroku application
$ heroku login
$ heroku create artist-portfolio

This adds a new remote to the Git repository (see git remote -v). You can also add the remote manually:

$ git remote add heroku https://git.heroku.com/artist-portfolio.git
  1. Add the Rust buildpack:
$ heroku buildpacks:set emk/rust

This buildpack will compile the Rust application on Heroku.

  1. Environment variables

You can set them either via the Heroku dashboard or the CLI:

$ heroku config:set KEY=VALUE

See also my post about using environment variables in Rust.

  1. Kick off the build

You only have to push your code to Heroku to trigger the build:

$ git push heroku main

That's it! You can now navigate to the URL provided by Heroku to see your application. If you don't know the URL, you can find it with:

$ heroku info

You can also open it directly from the CLI:

$ heroku open

If there is any issue (for example, upon first attempt I forgot to use the correct port: 8000, instead of Axum's default 3000), you can check the logs:

$ heroku logs --tail

Automate the deployment

Heroku is well integrated with GitHub, so you can automate the deployment process.

Go to the Heroku dashboard, select the application, and navigate to the "Deploy" tab. Connect your GitHub repository and select the branch you want to deploy. You can also conveniently enable automatic deployments.

For more information, see the Heroku documentation.

You can also map a custom domain to your Heroku application and get an SSL certificate.


That's it! Your Rust application on Heroku in a few simple steps.

When I try other platforms and deploy options (e.g. Docker), I will share them here ...

I built my first Rust website using Axum

I managed to make a website using Axum, a web framework for Rust, pretty similar to Flask in its minimalistic approach. Although it's a basic site, I'm happy with the result, and I learned a lot in the process.

result of the page I managed to build

In this post, I'll show you how I built a simple artist portfolio site using this framework.

Setup

cargo new artist-portfolio
cd artist-portfolio

I added the following dependencies:

[dependencies]
axum = "0.7"
dotenv = "0.15"
tokio = { version = "1", features = ["full"] }
tower = "0.4"
tower-http = { version = "0.5", features = ["fs"] }
askama = "0.11"
tracing = "0.1"
tracing-subscriber = "0.3"

The code

First I created the main file, src/main.rs, which contains the application setup and the routes.

The repo is here.

// will show you the imported modules in a bit ...
mod handlers;
mod s3;

use axum::{Router, routing::get, extract::Extension};
use dotenv::dotenv;
use tower_http::services::ServeDir;
use tracing_subscriber;
use std::sync::Arc;

#[tokio::main]
async fn main() {
    dotenv().ok();
    tracing_subscriber::fmt::init();

    // Initialize configuration
    let aws_s3_bucket = std::env::var("AWS_S3_BUCKET").expect("AWS_S3_BUCKET must be set");
    let config = Arc::new(Config { aws_s3_bucket });

    let app = Router::new()
        .route("/", get(handlers::about_handler))
        .route("/portfolio", get(handlers::portfolio_handler))
        .nest_service("/static", ServeDir::new("static"))
        .layer(Extension(config.clone()));

    let port = std::env::var("PORT").unwrap_or_else(|_| "3000".to_string());
    let addr = std::env::var("BIND_ADDR").unwrap_or_else(|_| "0.0.0.0".to_string());
    let bind_addr = format!("{}:{}", addr, port);
    let listener = tokio::net::TcpListener::bind(&bind_addr).await.unwrap();
    tracing::info!("Listening on {}", listener.local_addr().unwrap());
    axum::serve(listener, app).await.unwrap();
}

#[derive(Clone)]
pub struct Config {
    pub aws_s3_bucket: String,
}
  • The handlers module contains the request handlers for the different routes.
  • The s3 module contains the logic to interact with AWS S3 (I ended up simplifying this part for now, see in a bit).
  • The Config struct holds the configuration for the application (the AWS S3 bucket name holding the images). I'm using the Arc type to share this configuration across the application.
  • The dotenv crate is used to load environment variables from a .env file, see this article. I added an .env-template file in the repo to show you what variables you need to set.
  • The tracing and tracing-subscriber crates are used for logging.
  • The tower-http crate is used to serve static files from the static directory, which I happily got working for this app too.
  • The askama crate is used for templating, which I'll show that in the handlers section.
  • The tokio crate is used for async I/O.
  • The axum crate is the web framework itself and serves the application.

Creating the handlers

use askama::Template;
use axum::{
    extract::Extension,
    http::StatusCode,
    response::Html,
};
use crate::Config;
use crate::s3::get_images;
use std::sync::Arc;
use std::collections::HashMap;

#[derive(Template)]
#[template(path = "about.html")]
struct AboutTemplate {
    image_url: String,
    current_page: &'static str,
}

pub async fn about_handler(Extension(config): Extension<Arc<Config>>) -> Result<Html<String>, StatusCode> {
    let image_key = "artist.png";
    let image_url = format!("https://{}.s3.amazonaws.com/{}", config.aws_s3_bucket, image_key);

    let template = AboutTemplate { image_url, current_page: "home" };
    match template.render() {
        Ok(rendered) => Ok(Html(rendered)),
        Err(_) => Err(StatusCode::INTERNAL_SERVER_ERROR),
    }
}

#[derive(Template)]
#[template(path = "portfolio.html")]
struct PortfolioTemplate {
    images: Vec<(String, String)>,
    current_page: &'static str,
}

pub async fn portfolio_handler(Extension(config): Extension<Arc<Config>>) -> Result<Html<String>, StatusCode> {
    let images = get_images(&config.aws_s3_bucket).unwrap_or_else(|_| HashMap::new());
    // cannot get the template to work with a HashMap directly, so convert to a Vec of tuples
    let images: Vec<(String, String)> = images.into_iter().collect();
    let template = PortfolioTemplate { images, current_page: "portfolio"  };

    match template.render() {
        Ok(rendered) => Ok(Html(rendered)),
        Err(_) => Err(StatusCode::INTERNAL_SERVER_ERROR),
    }
}
  • The handlers module contains the request handlers for the different routes.
  • The askama crate is used for templating. I created two templates, about.html and portfolio.html, which are rendered by the handlers.
  • The about_handler function renders the about.html template, passing the image URL and the current page name, which I use to highlight the current page in the navigation bar.
  • The portfolio_handler function renders the portfolio.html template, passing a list of image URLs and the current page name.
  • The s3::get_images function is a placeholder for now, returning a HashMap of image URLs from the S3 bucket. I'll show you how I implemented this function in the next section. I did have to convert the HashMap to a Vec of tuples to get the template to work, as I couldn't get it to work with a HashMap directly.

Retrieving images from AWS S3

use std::collections::HashMap;
use std::error::Error;

pub fn get_images(aws_s3_bucket: &str) -> Result<HashMap<String, String>, Box<dyn Error>> {
    let mut images = HashMap::new();
    // Hardcoded for now to keep it simple, but in a real-world scenario
    // you would fetch the image URLs from an S3 bucket
    for i in 1..=10 {
        let full_image = format!("https://{}.s3.amazonaws.com/{}.webp", aws_s3_bucket, i);
        let thumbnail = full_image.replace(".webp", "_thumb.png");
        images.insert(full_image, thumbnail);
    }
    Ok(images)
}
  • The s3 module contains the logic to interact with AWS S3. I had this working at some point with the rusoto* crates, but I ended up simplifying it for this first iteration (old s3 code still here).
  • For now I am just returning a HashMap of image full + thumb URLs, but in a real-world scenario, you might fetch the images from a bucket (and only a few per request using pagination).
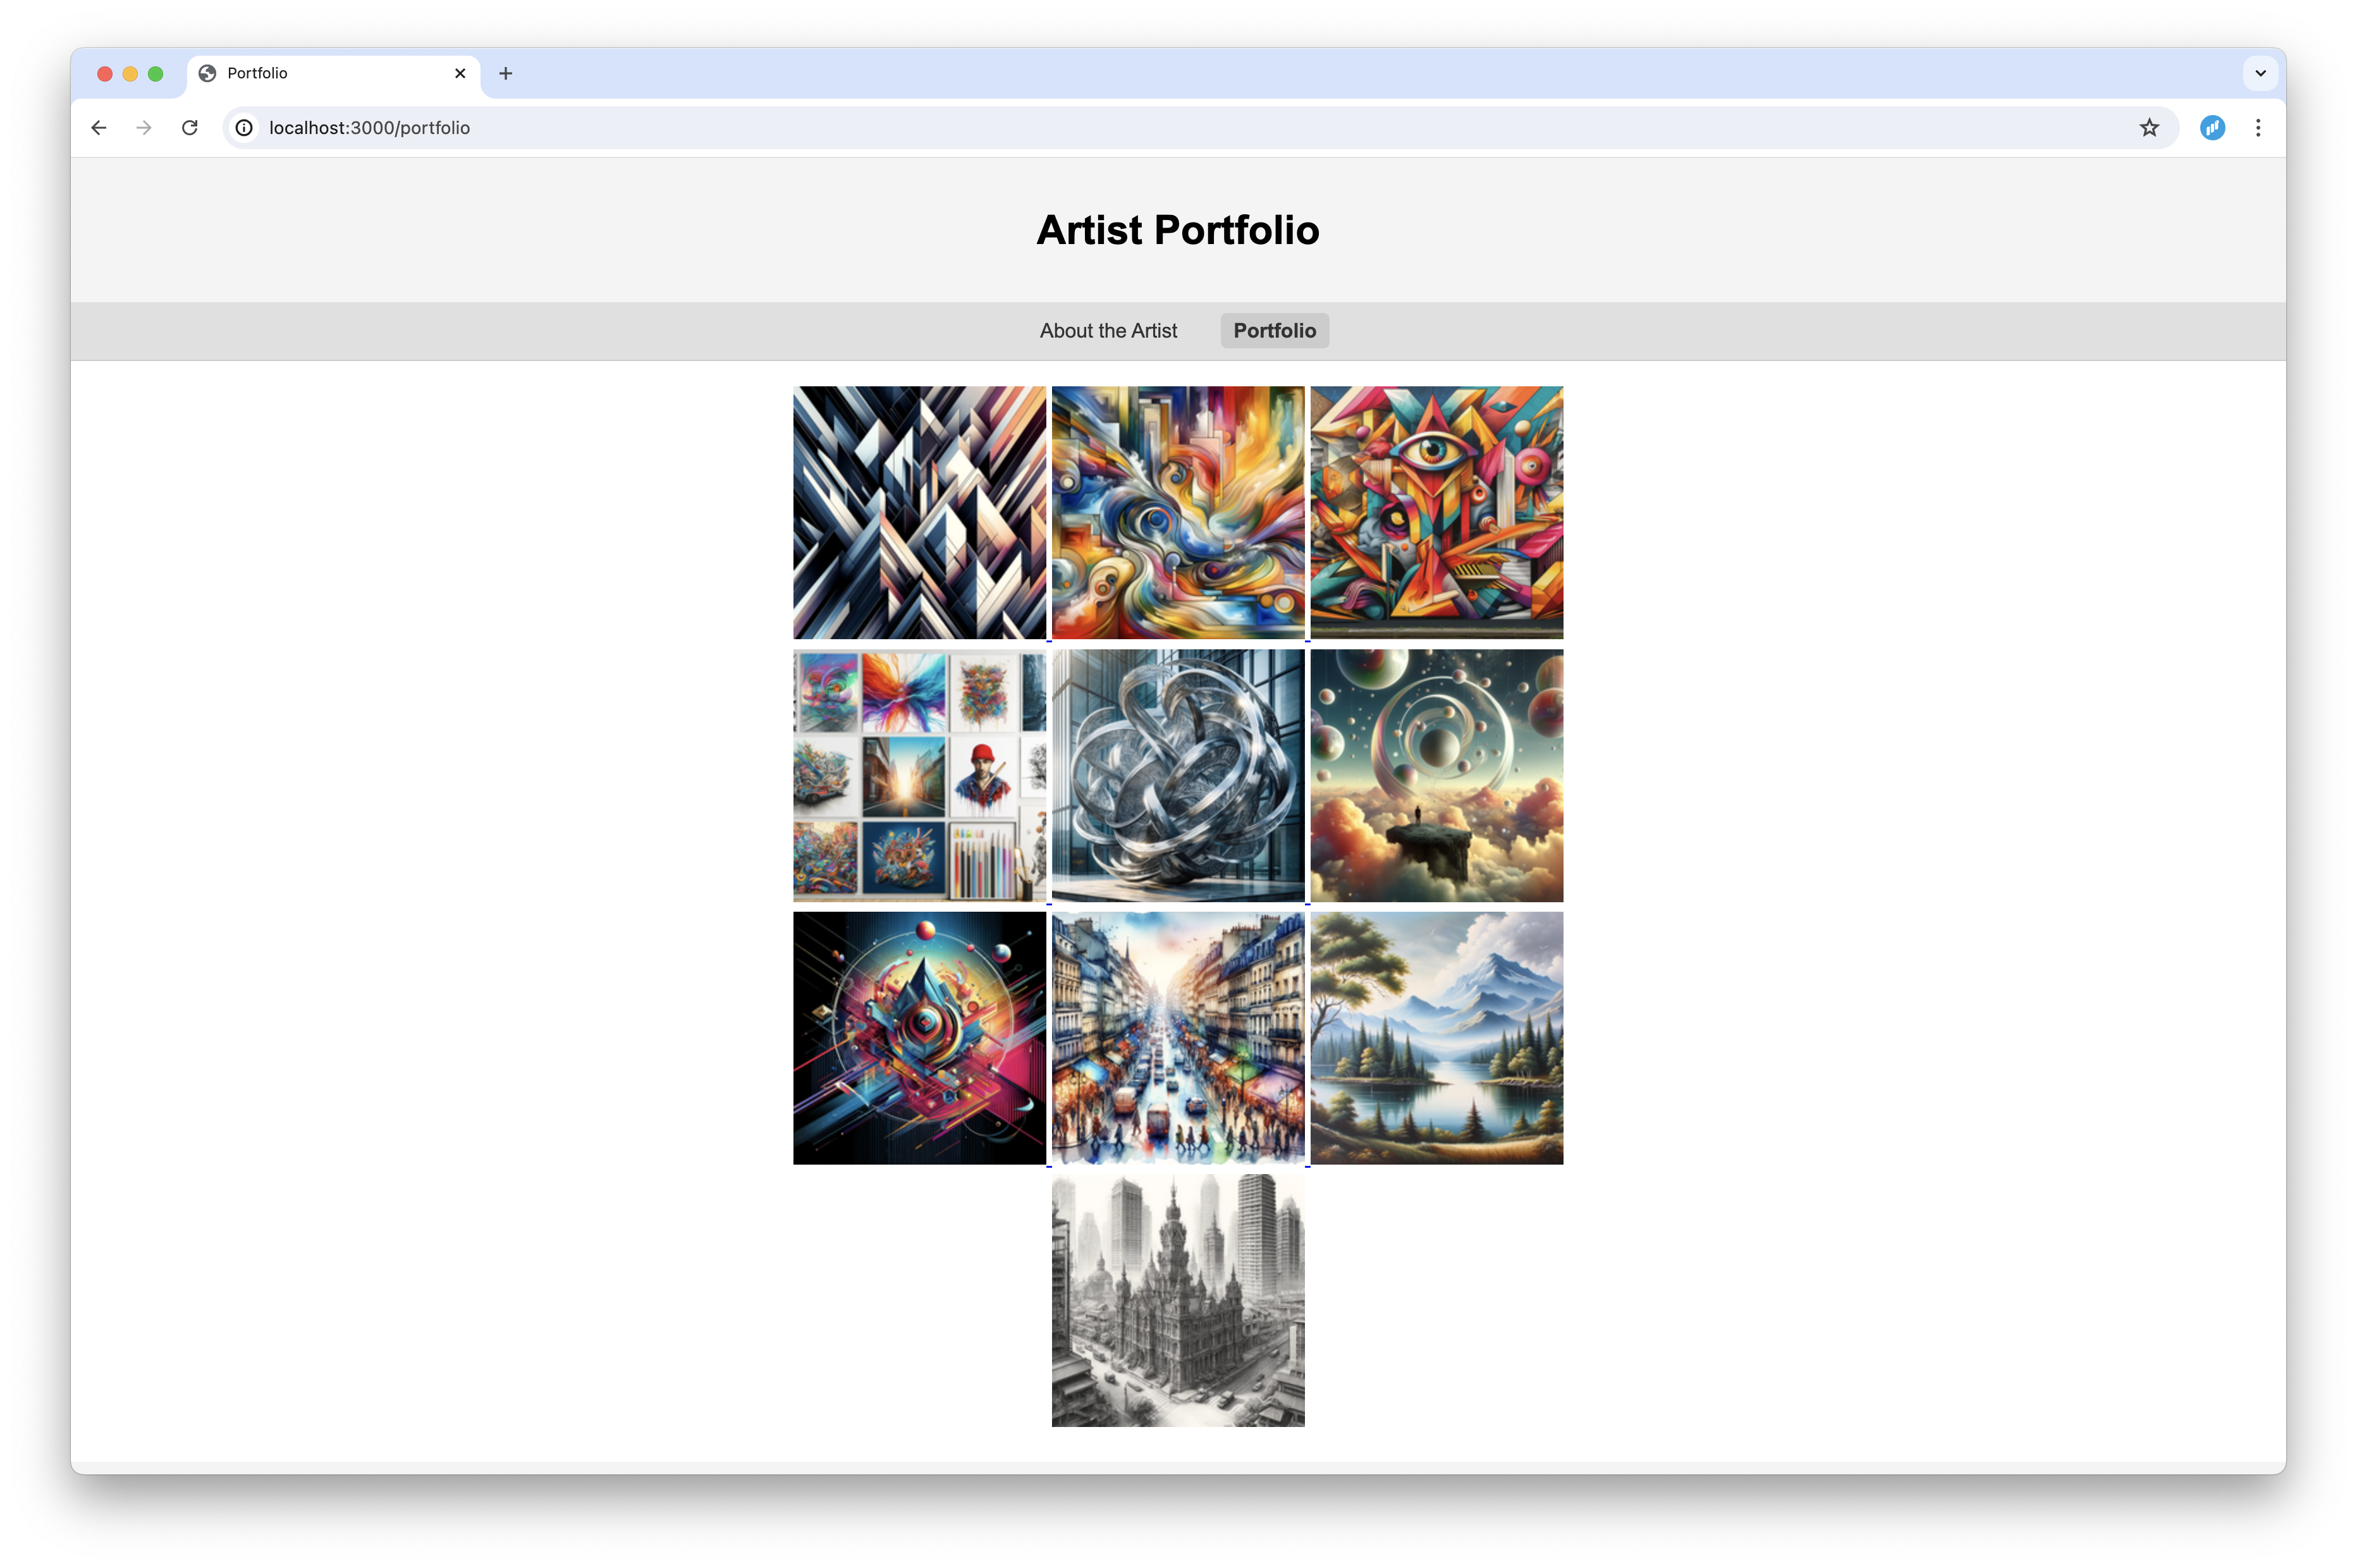
  • I used ChatGPT to make some nice artist work images and made another Rust script to resize them (will post it soon here ...)

Templates and static files

I'm using the askama crate for templating. I created two templates, about.html and portfolio.html, which extend a base.html template. The about.html template contains some fake text about the artist, and the portfolio.html template displays a list of images.

{% extends "base.html" %}

{% block title %}About the Artist{% endblock %}

{% block content %}
  <p>
    Bunch of fake text about the artist.
  </p>
{% endblock %}

This is the portfolio.html template:

{% extends "base.html" %}

{% block title %}Portfolio{% endblock %}

{% block content %}

<div class="image-container">
    {% for (full_image, thumbnail) in images %}
        <a href="#img{{ loop.index }}">
            <img src="{{ thumbnail }}" alt="Artwork">
        </a>
        <div class="lightbox" id="img{{ loop.index }}">
            <div class="lightbox-content">
                <a href="#" class="close-lightbox">&times;</a>
                <img src="{{ full_image }}" alt="Artwork">
            </div>
        </div>
    {% endfor %}
</div>
{% endblock %}

Note here I only managed to loop through a Vec of tuples, not a HashMap directly, so I had to convert the HashMap to a Vec of tuples in the handler (see above).

I also added some CSS classes to the images and lightbox to make them look nice (you can find the CSS here). This is why you see a loop.index in the template, which is used to generate unique IDs for the lightbox.

And finally, the base.html template:

<!DOCTYPE html>
<html lang="en">
<head>
    <meta charset="UTF-8">
    <title>{% block title %}Artist Portfolio{% endblock %}</title>
    <link rel="stylesheet" type="text/css" href="/static/style.css">
</head>
<body>
    <header>
      <h1>Artist Portfolio</h1>
    </header>

    <nav>
      <a href="/" class="{% if current_page == "home" %}active{% endif %}">About the Artist</a>
      <a href="/portfolio" class="{% if current_page == "portfolio" %}active{% endif %}">Portfolio</a>
    </nav>

    <div class="container">
      {% block content %}{% endblock %}
    </div>

    <footer>
      <p>&copy; 2024+ Artist Portfolio</p>
    </footer>
</body>
</html>

I like that apart from templating (and inheritance with them), I got static files to work so I could add a style.css file to style the page.

The static folder is served by the tower-http crate, which I added to the Router in the main file. It can also serve other static files like images, fonts, etc.

As mentioned before I also check each navigation item to see if it's the current page, and if so I add the active class to highlight it in the navigation bar.

Conclusion and next steps

I managed to build a simple artist portfolio site using Axum, a web framework for Rust. It's still a basic site, but I'm happy with the result so far πŸš€

Of course I heavily used ChatGPT to get this working, but I learned so much faster this way, libraries like Axum and Askama make most sense when you start to use them in the context of a project.

Just reading about them won't get you anywhere near being able to use them effectively. There's still a lot to learn, but this gave me some good basic insights how to build a website with Rust. πŸ’‘

Again you can find the code in the repo.


I want to further explore how to interact with AWS S3, and I want to learn how to add a contact form to also handle form data and send emails. πŸ“ˆ

I also managed to deploy the site to Heroku, which I'll discuss soon here, it was really easy to do. 😍

What will you build with Axum? Reach out to me on social media, I'd love to hear about it ... 😎

How to handle environment variables in Rust

In this article, I will share how to isolate your environment variables from production code using the dotenv crate in Rust.

Why is this important? πŸ€”

As we can read in The Twelve-Factor App / III. Config section you want to separate config from code:

Apps sometimes store config as constants in the code. This is a violation of twelve-factor, which requires strict separation of config from code.

See The twelve-factor app - III. Config for more details.

Basically, you want to be able to make config changes independently from code changes. πŸ’‘

We also want to hide secret keys and API credentials! Notice that git is very persistent (see this PyCon talk for example) so it’s important to get this right from the start.

Loading environment variables in Rust

You can load in environment variables like this in Rust:

use std::env;

let my_var = env::var("MY_VAR").expect("MY_VAR must be set");

But that requires you to set the environment variables before running your program (export MY_VAR=my_value from the command line). This is not ideal for production code and even for local development, it can be cumbersome.

It's common to keep a local .env file with your environment variables (don't forget to add this file to your .gitignore!)

Using the dotenv crate πŸ“ˆ

Researching how you can do this in Rust, I stumbled upon the dotenv crate, which makes handling environment variables straightforward.

First, add the crate to your Cargo.toml:

[dependencies]
dotenv = "0.15.0"

Secondly, you create an .env file in the root of your project:

MY_VAR=my_value

Again it’s important that you ignore this file with git, otherwise, you might end up committing sensitive data to your repo/project. 😱

Ignoring .env in git

Not sure what the Rust standard is, a standard Rust .gitignore file does not include the .env pattern, Python's one does.

What I usually do (in Python) is commit an empty .env-example (or .env-template) file so other developers know what they should set.

So a new developer (or me checking out the repo on another machine) can do a cp .env-template .env and populate the variables. As the (checked out) .gitignore file contains .env, git won’t show it as a file to be staged for commit.

Example using dotenv

To load in the variables from this file, we use a few lines of code:

extern crate dotenv;
use dotenv::dotenv;
use std::env;

fn main() {
    dotenv().ok();

    let background_img = env::var("THUMB_BACKGROUND_IMAGE").expect("THUMB_BACKGROUND_IMAGE must be set");
    let font_file = env::var("THUMB_FONT_TTF_FILE").expect("THUMB_FONT_TTF_FILE must be set");

    println!("Background Image: {}", background_img);
    println!("Font File: {}", font_file);
}
  • dotenv().ok() loads the environment variables from the .env file.
  • .expect is used to handle the case where the environment variable is not set.

With this setup, you can now access your environment variables using env::var:

$ cargo run -q
thread 'main' panicked at src/main.rs:8:61:
THUMB_BACKGROUND_IMAGE must be set: NotPresent

This is because we didn't set the environment variables yet in .env, doing so:

# .env
THUMB_BACKGROUND_IMAGE=some_image.jpg
THUMB_FONT_TTF_FILE=some_font.ttf

Now it works as expected πŸŽ‰

$ cargo run -q
Background Image: some_image.jpg
Font File: some_font.ttf

This is actually pretty similar to Python using the python-dotenv library. 🐍

from dotenv import load_dotenv
import os

load_dotenv()

background_img = os.getenv("THUMB_BACKGROUND_IMAGE")
font_file = os.getenv("THUMB_FONT_TTF_FILE")

For boolean values, a common requirement for configuration settings like DEBUG, you can use env::var and parse the string to a boolean like this:

let is_debug: bool = env::var("DEBUG").map(|v| v == "true").unwrap_or(false);
...
println!("Debug: {}", is_debug);
  • This works when setting DEBUG=true or DEBUG=false in your .env file.
  • .map is used to convert the string to a boolean.
  • The final unwrap_or is used to handle the case where the environment variable is not set or contains an invalid value.

Conclusion

Handling environment variables in Rust is straightforward using the dotenv crate. This approach keeps your configuration separate from your code, making it easier to manage and secure.

I hope this article helps you to keep your environment variables safe and secure. πŸ›‘οΈ

Happy coding! πŸ¦€

This article is an adaption from our Python article: How to handle environment variables in Python.

Converting markdown files to HTML in Rust

In my journey of learning Rust, I decided to pick a small Python program that converts markdown files to html + makes an index page for those files, and rewrite it in Rust.

To learn the syntax and also see if I could speed it up.

In this post, I’ll walk you through the script and how I run it in a GitHub Action to automatically generate a zip file of the HTML files and upload it as an artifact.

This is in the context of a new set of Python exercises I’m working on called Newbie Bites Part II. I wanted to convert the markdown files to HTML to make it easier to read and navigate for test users.

The Rust script

Code repo:

use std::fs::{self, File};
use std::io::{self, Write};
use std::path::Path;
use std::ffi::OsStr;
use pulldown_cmark::{Parser, Options, html};
use clap::{App, Arg};
use glob::glob;

fn convert_md_to_html(md_files: Vec<String>, output_dir: &str) -> io::Result<()> {
    if !Path::new(output_dir).exists() {
        fs::create_dir(output_dir)?;
    }

    let mut index_content = String::from(
        "<html><head><title>Index of Newbies Bites Part II</title></head><body><h1>Index of Newbie Bites Part II</h1><ul>"
    );

    for md_file in md_files {
        let subdir_name = Path::new(&md_file)
            .parent()
            .and_then(Path::file_name)
            .and_then(OsStr::to_str)
            .unwrap_or("");

        if !subdir_name.chars().next().unwrap_or(' ').is_digit(10) {
            continue;
        }

        let html_file_name = format!("{}.html", subdir_name);
        let html_file_path = Path::new(output_dir).join(&html_file_name);

        let md_content = fs::read_to_string(&md_file)?;
        let mut html_content = String::new();
        let parser = Parser::new_ext(&md_content, Options::empty());
        html::push_html(&mut html_content, parser);

        let mut html_file = File::create(html_file_path)?;
        write!(
            html_file,
            "<html><head><title>{}</title></head><body>{}</body></html>",
            subdir_name, html_content
        )?;

        index_content.push_str(&format!(
            "<li><a href=\"{}\">{}</a></li>\n",
            html_file_name, subdir_name
        ));
    }

    index_content.push_str("</ul></body></html>");

    let index_file_path = Path::new(output_dir).join("index.html");
    let mut index_file = File::create(index_file_path)?;
    write!(index_file, "{}", index_content)?;

    println!("HTML pages and index generated in {}", output_dir);

    Ok(())
}

fn main() -> io::Result<()> {
    let matches = App::new("Markdown to HTML Converter")
        .version("1.0")
        .author("Your Name <your.email@example.com>")
        .about("Converts Markdown files to HTML and generates an index")
        .arg(
            Arg::new("directory")
                .short('d')
                .long("directory")
                .value_name("DIRECTORY")
                .help("Specifies the directory to search for Markdown files")
                .takes_value(true)
                .required(true),
        )
        .get_matches();

    let directory = matches.value_of("directory").unwrap();
    let pattern = format!("{}/[0-9][0-9]_*/*.md", directory);

    let md_files: Vec<String> = glob(&pattern)
        .expect("Failed to read glob pattern")
        .filter_map(Result::ok)
        .filter_map(|path| path.to_str().map(String::from))
        .collect();

    let output_dir = "html_pages";
    fs::create_dir_all(output_dir)?;

    convert_md_to_html(md_files, output_dir)
}
  • The script uses glob to find all markdown files in a directory.
  • It then converts each markdown file to HTML using pulldown-cmark.
  • It creates an index page with links to each HTML file.
  • The HTML files and index page are saved in an html_pages directory.
  • The script uses clap for command-line argument parsing, which I showed in my previous article.

Running the script in a GitHub Action

I ended up using this script as part of another repo where I was working on mentioned Python exercises. I wanted to run this script in a GitHub Action to automatically generate the HTML files and upload them as an artifact.

Here’s the GitHub Action workflow file:

name: Build and Upload HTML Pages and Exercise Zip

on:
  push:
    branches:
      - main

jobs:
  build:
    runs-on: ubuntu-latest

    steps:
      - name: Checkout repository
        uses: actions/checkout@v2

      - name: Set up Rust
        uses: actions-rs/toolchain@v1
        with:
          toolchain: stable

      - name: Install dependencies
        run: sudo apt-get install -y zip unzip

      - name: Build and run Rust md to html script
        working-directory: ./md_to_html
        run: cargo run --release

      - name: Run zip_bites.sh script to zip up exercises
        run: ./zip_bites.sh

      - name: Extract both zip files
        run: |
          mkdir newbies2
          unzip md_to_html/bite_descriptions.zip -d newbies2/
          unzip newbies-partII.zip -d newbies2/

      - name: Create combined zip file
        run: |
          cd newbies2
          zip -r ../newbies_part2.zip .

      - name: Upload artifact
        uses: actions/upload-artifact@v2
        with:
          name: newbies-part2
          path: newbies_part2.zip

There are some additional steps in the workflow file to zip up the exercises and combine them with the HTML files, but the main part is running the Rust script using cargo run --release after setting up the Rust toolchain.

The script generates the HTML files and index page, which are then zipped up and uploaded as an artifact.

Conclusion

I enjoyed rewriting a Python script in Rust and running it in a GitHub Action. It taught me some good Rust pieces, like how to work with files and directories, and how to use external crates like clap and pulldown-cmark. I also learned about Rust's release build performance improvements:

$ time cargo run -- --directory /Users/pybob/code/newbies-part2
...
cargo run -- --directory /Users/pybob/code/newbies-part2  0.04s user 0.03s system 26% cpu 0.292 total

$ cargo build --release

$ time ./target/release/md_to_html --directory /Users/pybob/code/newbies-part2
...
./target/release/md_to_html --directory /Users/pybob/code/newbies-part2  0.00s user 0.01s system 79% cpu 0.020 total

As I always say, the most you learn by building concrete things and this exercise was no exception. πŸŽ‰

And usually you learn a thing or two more as a bonus, in this case how to upload artifacts in a GitHub Action. πŸ“ˆ

I hope this post was helpful if you’re looking to convert markdown files to HTML in Rust + how to run Rust scripts in GitHub Actions. πŸ¦€ πŸ’‘

Building a nice command-line interface with Clap

Yesterday I wanted to improve the command-line of Pybites Search that which was pretty primitive:

# new code is in v0.5.0
$ git checkout v0.4.0
$ cargo build --release
   Compiling pybites-search v0.4.0 (/Users/bbelderbos/code/rust/pybites-search)
   ...

# old usage message

√ pybites-search (tags/v0.4.0) $ ./target/release/psearch
Usage: search <search_term> [<content_type>] [--title-only]

# no help

?127 pybites-search (tags/v0.4.0) $ ./target/release/psearch --help
[bite] Using argparse to interface with a grocery cart
https://codechalleng.es/bites/58
...

# no version

√ pybites-search (tags/v0.4.0) $ ./target/release/psearch --version

# no multiple search terms

√ pybites-search (tags/v0.4.0) $ ./target/release/psearch grocery cart

# no short options

√ pybites-search (tags/v0.4.0) $ ./target/release/psearch grocery -t

# not clear that the 2nd arg here is the content type

√ pybites-search (tags/v0.4.0) $ ./target/release/psearch fastapi video
Pybites podcast 151 - Mastering Open Source: The Journey to FastAPI Expertise, One Issue at a Time
https://www.youtube.com/watch?v=pz2gzSgw7y8
...

I just read about Clap in the Command-line Rust book and decided to give it a go.

Here is the new version:

√ pybites-search (main) $ cargo install pybites-search
...
     Ignored package `pybites-search v0.5.0` is already installed, use --force to override

# using the installed binary

√ pybites-search (main) $ which psearch
/Users/bbelderbos/.cargo/bin/psearch

# version and help are supported now

?1 pybites-search (main) $ psearch --version
psearch 0.5.0

√ pybites-search (main) $ psearch --help
A command-line search tool for Pybites content

Usage: psearch [OPTIONS] [SEARCH_TERMS]...

Arguments:
  [SEARCH_TERMS]...

Options:
  -c, --content-type <CONTENT_TYPE>
  -t, --title-only
  -h, --help                         Print help
  -V, --version                      Print version

# required search term argument

√ pybites-search (main) $ psearch
Error: At least one search term should be given.
A command-line search tool for Pybites content

Usage: psearch [OPTIONS] [SEARCH_TERMS]...

Arguments:
  [SEARCH_TERMS]...

Options:
  -c, --content-type <CONTENT_TYPE>
  -t, --title-only
  -h, --help                         Print help
  -V, --version                      Print version

The Error message actually renders red in the terminal for which I used the colored crate.

Continuing with the new version:

√ pybites-search (main) $ psearch fastapi
[article] Using Python (and FastAPI) to support PFAS research
https://pybit.es/articles/using-python-and-fastapi-to-support-pfas-research/
...

# search for podcasts only

√ pybites-search (main) $ psearch fastapi -c podcast
#160 - Unpacking Pydantic's Growth and the Launch of Logfire with Samuel Colvin
https://www.pybitespodcast.com/14997890/14997890-160-unpacking-pydantic-s-growth-and-the-launch-of-logfire-with-samuel-colvin
...

# search title only

√ pybites-search (main) $ psearch fastapi -t
[article] Using Python (and FastAPI) to support PFAS research
https://pybit.es/articles/using-python-and-fastapi-to-support-pfas-research/
...

# multiple search terms (joined and regex compiled)

√ pybites-search (main) $ psearch fastapi pfas -t
[article] Using Python (and FastAPI) to support PFAS research
https://pybit.es/articles/using-python-and-fastapi-to-support-pfas-research/
...

# short options combined: search only in titles and content type == video

√ pybites-search (main) $ psearch fastapi pfas -t -c video
Pybites podcast 122 - Using Python (and FastAPI) to support PFAS research
https://www.youtube.com/watch?v=c5EtLNhrnH0

Clap code

The code change was relatively small:

#[derive(Parser)]
#[command(name = "psearch", version, about)]
struct Cli {
    search_terms: Vec<String>,

    #[arg(short = 'c', long = "content-type")]
    content_type: Option<String>,

    #[arg(short = 't', long = "title-only")]
    title_only: bool,
}

...
...

#[tokio::main]
 async fn main() -> Result<(), Box<dyn std::error::Error>> {
     let cli = Cli::parse();

     if cli.search_terms.is_empty() {
         eprintln!("{}", "Error: At least one search term should be given.".red());
         Cli::command().print_help()?;
         std::process::exit(1);
     }

     let search_term = cli.search_terms.iter().map(|term| regex::escape(term)).collect::<Vec<_>>().join(".*");
     let content_type = cli.content_type.as_deref();
     let title_only = cli.title_only;

     ...
     ...

     search_items(&items, &search_term, content_type, title_only);
  • I defined a struct Cli with the fields I needed (related article).
  • I used the #[arg] attribute to define the short and long options.
  • I used the #[command] attribute to define the name, version, and about, which are inferred from the Cargo.toml file.
  • In the main function, I used Cli::parse() to parse the command-line arguments.
  • I checked if the search terms are empty and printed an error message if they are. It's best practice to print the error message to stderr (using eprintln) and exit the script with a non-zero status code (Unix convention).
  • I used the regex crate to make a regex pattern from the search terms. I had to escape the search terms because they could contain special characters. I used the regex::escape function for this.
  • I needed the as_deref method to convert the Option<String> to an Option<&str>. This is useful because I wanted to pass the content type to the search_items function, which accepts an Option<&str>. I still need to get used to the ownership and borrowing rules in Rust, but I am getting there. It will become more intuitive with more practice ...
  • Lastly I passed the parsed arguments to the search_items function.

This looks pretty clean and the pleasant way of defining CLI interfaces this way reminds me of Python's Typer library.

Typer also uses type annotations (and other beautiful abstractions) to make it easy to define CLI interfaces.

Here is an example for comparison:

import typer  # pip install typer

app = typer.Typer()

@app.command()
def psearch(
    search_terms: list[str],
    content_type: str = typer.Option(None, "--content-type", "-c", help="The type of content to search for"),
    title_only: bool = typer.Option(False, "--title-only", "-t", help="Search only in titles")
):
    search_term = ".*".join(search_terms)
    # ... rest of the implementation ...

Conclusion

I am happy with the new 0.5.0 version of Pybites Search, which thanks to Clap has a much nicer command-line interface.

Clap reminds me of Typer in Python, which makes it easy to define CLI interfaces using type annotations.

I will surely use Clap in future command-line apps, it's a great library to work with.