Python Built-ins vs. Rust method chaining (and how it works)

If you're familiar with Python, you know how powerful its built-in functions for iterables can be.

Functions like map, filter, and reduce provide a simple and expressive way to handle collections.

Rust offers similar functionality through iterators and method chaining, which, while different in syntax, provide equally powerful capabilities.

This post explores how Python built-ins translate to Rust's method chaining with iterators.

Python Built-ins vs. Rust Method Chaining

Python's Approach

Python provides many built-in functions to operate on iterables, such as map, filter, zip, enumerate, all, any, etc.

These functions are easy to use and understand, making them a staple in Python programming. I did an overview video of them you can watch here.

Rust's Approach

Rust, on the other hand, implements these functionalities as methods on iterator types.

This approach leverages Rust's strengths in type safety and performance. By chaining methods, Rust allows you to build complex operations in a concise and readable manner.

Example Comparisons

Let's compare some common operations using Python built-ins and Rust method chaining:

map

Python:

numbers = [1, 2, 3]
squared = list(map(lambda x: x**2, numbers))
print(squared)  # Output: [1, 4, 9]

Rust:

let numbers = vec![1, 2, 3];
let squared: Vec<i32> = numbers.iter().map(|&x| x * x).collect();
println!("{:?}", squared);  // Output: [1, 4, 9]

filter

Python:

numbers = [1, 2, 3, 4]
even = list(filter(lambda x: x % 2 == 0, numbers))
print(even)  # Output: [2, 4]

Rust:

let numbers = vec![1, 2, 3, 4];
let even: Vec<i32> = numbers.iter().filter(|&&x| x % 2 == 0).copied().collect();
println!("{:?}", even);  // Output: [2, 4]

zip

Python:

list1 = [1, 2, 3]
list2 = ['a', 'b', 'c']
for item1, item2 in zip(list1, list2):
    print(item1, item2)  # Output: 1 a, 2 b, 3

Rust:

let list1 = vec![1, 2, 3];
let list2 = vec!['a', 'b', 'c'];
for (item1, item2) in list1.iter().zip(list2.iter()) {
    println!("{} {}", item1, item2);  // Output: 1 a, 2 b, 3 c
}

enumerate

Python:

items = ['a', 'b', 'c']
for index, value in enumerate(items):
    print(index, value)  # Output: 0 a, 1 b, 2 c

Rust:

let items = vec!['a', 'b', 'c'];
for (index, value) in items.iter().enumerate() {
    println!("{} {}", index, value);  // Output: 0 a, 1 b, 2 c
}

How Method Chaining Works in Rust

Rust’s method chaining is possible because each method in the iterator chain returns another iterator. This allows you to call multiple methods in sequence. Here's a deeper dive into how this works:

Example: Chaining map and filter

let numbers = vec![1, 2, 3, 4];

let result: Vec<i32> = numbers
    .iter()                   // Creates an iterator over the elements of the vector
    .map(|&x| x * x)          // Applies the closure to each item, returns an iterator of squared values
    .filter(|&x| x % 2 == 0)  // Filters the items, returning only those that are even
    .collect();               // Collects the iterator into a vector

println!("{:?}", result);  // Output: [4, 16]

Quite elegant, isn't it? Let's break down the steps:

Step-by-Step Breakdown

  1. Creating the Iterator:

    numbers.iter()
    

    This creates an iterator over the references to the elements of the vector numbers.

  2. Mapping Values:

    .map(|&x| x * x)
    

    The map method creates a new iterator that applies the given closure to each item, in this case, squaring the values.

  3. Filtering Values:

    .filter(|&x| x % 2 == 0)
    

    The filter method creates another iterator that only yields items for which the given predicate is true, in this case, retaining even numbers.

  4. Collecting Results:

    .collect()
    

    The collect method consumes the iterator and collects the resulting items into a new collection, in this case, a vector.

How It Works Internally

Each method (map, filter, etc.) returns a new iterator type. For example:

  • numbers.iter() returns an Iter iterator.
  • Iter has a method map that returns a Map<Iter, F> iterator.
  • Map<Iter, F> has a method filter that returns a Filter<Map<Iter, F>, G> iterator.

These iterator types (Iter, Map, Filter) all implement the Iterator trait, allowing them to be chained together seamlessly.

In Python we really like generators and lazy operations (meaning any computation is only done when needed). Rust iterators are also lazy by default, which can lead to significant performance improvements, especially when working with large collections.


Traits are a fundamental feature in Rust that allow you to define shared behavior across different types. A trait is a collection of methods defined for an unknown type: Self. Traits can be implemented for any data type. In this case, the Iterator trait provides a common interface for all iterators, enabling method chaining.

By implementing the Iterator trait, a type gains the ability to be iterated over using methods like map, filter, and collect. This trait-based approach ensures that any type that implements Iterator can seamlessly integrate with Rust's powerful iterator combinators, promoting code reuse and modularity.

A dedicated article to follow on this topic...

Benefits of Chaining

  1. Readability: Method chaining provides a clear and concise way to express a series of operations on a collection.
  2. Performance: Iterators in Rust are lazy and can be highly optimized by the compiler. Operations are performed only when needed.
  3. Extensibility: By implementing the Iterator trait for custom types, you can leverage all the powerful methods available on iterators.

Conclusion

So what are Python's robust and performant built-ins in Rust? You'll often find them as methods on iterator types, allowing you to chain operations together in a fluent and efficient manner. 😍 πŸ“ˆ

I hope this comparison has given you a better understanding of how Rust's method chaining with iterators can be a powerful tool in your programming arsenal. Happy coding! πŸ¦€ πŸš€

A little alarm clock CLI app in Rust

The other day I pushed my second crate to crates.io. It's called cli-alarm and it's a simple command line tool to play an alarm sound after a specified amount of time. It has an option to repeat the alarm at regular intervals as well.

Why this project?

I created it because I wanted to play an alarm sound from the terminal as a reminder to take a break from the computer every hour, we progammers tend to sit for too long without moving which is really bad!

I had built this with Python before, but I wanted to try it with Rust this time. And that's actually a good way to learn a new language: by building something you've already built with another language. You already know what you want to build, so you can focus on the new language.

How to use it?

Here's how you can use it:

cargo install cli-alarm

$ alarm -m 1
Alarm set to go off in 1 minutes.
...
plays sound once after 1 minute
...

$ alarm -m 1 -r
Recurring alarm set for every 1 minutes.
...
plays sound every minute
...

Curious how it got this alias? It's because of the [[bin]] section in the Cargo.toml file:

[[bin]]
name = "alarm"
path = "src/main.rs"

Learnings

Code so far here.

A couple of cool things I learned while building this:

Like last time I am using attributes (derive macros) to define the CLI interface which is pretty concise:

#[derive(Parser, Debug)]
#[command(author, version, about, long_about = None)]
struct Cli {
    #[arg(short = 'm', long, required = true)]
    minutes: u64,
    #[arg(short = 'r', long, default_value_t = false)]
    repeat: bool,
    #[arg(short, long, env = "ALARM_FILE")]
    file: Option<String>,
}

This time around I learned that clap also supports environment variables. Here I use it to set the alarm sound file if not provided as an argument.

  • I used the rodio crate to play the alarm sound. It's a simple and easy-to-use audio library. Next step is to figure out how to play an audio message in addition to the alarm sound.
use rodio::{Decoder, OutputStream, source::Source};
...
let (_stream, stream_handle) = OutputStream::try_default().unwrap();
let file = File::open(audio_file).unwrap();
let source = Decoder::new(BufReader::new(file)).unwrap();
stream_handle.play_raw(source.convert_samples()).unwrap();

That's a lot of unwrapping, I should probably handle the errors more gracefully, still a lot to learn ...

  • I used the chrono crate to print the current time in the log messages:
use chrono::Local;
...
println!("Playing alarm at {}", Local::now().format("%Y-%m-%d %H:%M:%S"));

Unlike Python's datetime, Rust doesn't have a built-in way to format dates and times, so you need to use a crate for that. This is a common pattern in Rust: the standard library is kept small and you use crates for additional functionality.

Other notable Python Standard Library packages you'll miss as a Pythonista for example are: random, re, csv, and json, but once you get used to just cargo adding the crates you need, you hardly notice the difference.

  • I used the reqwest crate to download the default alarm sound. It's a simple and easy-to-use HTTP client, which I had already used for my Pybites Search app, see here.

  • Where in Python you use while True: to create an infinite loop, in Rust you use loop { ... }.

  • You can use thread::sleep to pause the execution of the program for a specified amount of time, which seems a fit for this app.

  • Like Python, Rust has a Path struct (object) to work with file paths in a platform-independent way. I like structs in Rust, see also here.

  • I use cfg!(target_os = "windows") to check if the OS is Windows. This is a built-in macro in Rust (in Python you'd use sys.platform or the platform module).

Improvement ideas / next steps

Although this is not very good Rust code yet, I'm happy with the progress so far, specially having a working program that does something useful.

Some things to improve:

  • Play an audio message as mentioned.

  • Download the default alarm file to a sensible location or maybe a temp dir to not clutter the user's filesystem.

  • Handle errors more gracefully, e.g. using Result instead of unwrap to better propagate errors.

  • Modularize the code more to learn how to work with multiple files / modules.

  • Linting and formatting (and automate this with a pre-commit hook as I tend to do with Python, see here).

  • Add documentation (and host it somewhere, e.g. GitHub Pages).

  • Add tests (although this app being heavy on IO and time-based, probably not the best app to start to learn about testing in Rust lol).

So good for a couple of more articles here ...

Conclusion

The best way to learn is to build small projects! This way you learn to put things together which is an important skill in programming. You can also gradually increase the complexity of the projects you build.

I'm happy with the progress so far and how this way of learning Rust constantly challenges me to learn more about the language and tooling. I'm looking forward to diving into more advanced topics like error handling, testing, modularization, and more ...

Constants in Python vs Rust

In Python you define constants using uppercase variable names (dictated by PEP8), for example:

TIMEOUT = 10
ENDPOINT = "https://codechalleng.es/api/content/"
CACHE_FILE_NAME = ".pybites-search-cache.json"
DEFAULT_CACHE_DURATION = 86400  # Cache API response for 1 day

Nothing prevents you from overriding these values, but it's a convention to treat them as constants.

To add a layer of immutability, you can use type hints with the Final qualifier from the typing module:

from typing import Final

TIMEOUT: Final[int] = 10
ENDPOINT: Final[str] = "https://codechalleng.es/api/content/"
CACHE_FILE_NAME: Final[str] = ".pybites-search-cache.json"
DEFAULT_CACHE_DURATION: Final[int] = 86400  # Cache API response for 1 day

When you try to override these values mypy will raise an error. Your IDE might also proactively warn you about it.

Overall type hints are a good practice in Python, they make your code more readable and bring some of Rust's strictness to Python. πŸ’‘ 😍 πŸ“ˆ

Another example of enforcing immutability in Python is using frozen=True on a dataclass.

Now let's look at Rust. You define constants using the const keyword and define the type explicitly:

const TIMEOUT: u64 = 10;
const ENDPOINT: &str = "https://codechalleng.es/api/content/";
const CACHE_FILE_NAME: &str = ".pybites-search-cache.json";
const DEFAULT_CACHE_DURATION: u64 = 86400; // Cache API response for 1 day

The &str type is a reference to a string, which avoids copying data around. In contrast, String is a heap-allocated string.

&str does not allocate memory itself; it references an existing string slice. This is more efficient for passing around string literals, which are stored in the program's binary and are immutable, making &str ideal for constants.

The key point is that you cannot override these values; the compiler will raise an error.

Rust also has a static keyword which is used for global variables, but that's a topic for another article.

In both Python and Rust, you can define enums to group related constants together, but that's a topic for another article too.

Conclusion

Both Python and Rust have clear conventions for defining constants. Rust enforces immutability strictly at the language level, while in Python, you can achieve a similar level of strictness by using type hints.

Each language offers tools and conventions that help maintain the integrity of your constants, ensuring reliable and predictable behavior in your programs.

How to resize images in Rust

The other day I built a simple website and needed to resize some images so I decided to figure out how to do this in Rust.

I found a crate called image that made this easy. Here's how I did it.

Full code in this repo.

After adding image to your Cargo.toml or doing a cargo add image you can use it like this.

First you make an image object:

use std::path::Path;

let input_path = Path::new("workshop.jpg");
let img = image::open(input_path)?;

Here is the original image:

Image to make a thumb of

The ? operator is a concise way to handle errors, if image::open fails it will return an error and the function will return early.

Next we can use the resize_exact method to resize the image to the desired width and height:

let thumbnail = img.resize_exact(200, 200, image::imageops::FilterType::Lanczos3);

The FilterType is optional, it defaults to Lanczos3 which is a high-quality resampling filter.

Finally we can save the resized image to disk:

let output_path = Path::new("workshop_thumbnail.jpg");
thumbnail.save(output_path)?;
200 x 200 thumbnail image

That's a bit skewed though, because the original image was 800x600 and we resized it to 200x200. If you want to keep the aspect ratio you can use the resize method instead of resize_exact:

let thumbnail = img.resize(200, 200, image::imageops::FilterType::Lanczos3);

That leads to an image of 200x150 in my case which looks better:

200 x 150 thumbnail image

Putting it all together:

use image::ImageError;
use std::path::Path;

fn main() -> Result<(), ImageError> {
    let input_path = Path::new("workshop.jpg");
    let img = image::open(input_path)?;

    // Resize image to fit within 200x200 while maintaining aspect ratio
    let thumbnail = img.resize(200, 200, image::imageops::FilterType::Lanczos3);

    let output_path = Path::new("workshop_thumbnail.jpg");
    thumbnail.save(output_path)?;

    Ok(())
}

Note that because we're using the ? operator we need to update the return type of our function to Result<(), ImageError>.

The repo has some other interesting things:

  • I use clap to parse command line arguments, see also this article.

  • I use img.save_with_format(output_path, ImageFormat::Png)?; to save the image in a different format (ChatGPT gave me webp fake images so I converted them to png).

  • It uses glob (similar to Python's glob) with a pattern ("{}/*{}") to find all files in a directory with a certain extension, which can be provided as an argument to the program.

  • I use the match statement to handle errors and print messages to the console in various places.

Conclusion

There you go, a quick way to resize images in Rust.

The image crate is powerful and easy to use, similar to Pillow in Python. 😍 πŸ“ˆ

You can use the resize method to keep the aspect ratio or resize_exact to resize to an exact width and height.

Again, the full code of this mini project is here.

Use rust-analyzer + ALE to show errors as you code in Rust

The more advanced you become as a developer the more you realize that the speed of coding is not just about language syntax or typing, it's as much about the tools and techniques you use.

One of my best Python coding setup tweaks has been showing errors upon saving files, for which I use this plugin. This speeds up development significantly! 😍 πŸ“ˆ

I wanted to do the same for Rust coding, specially because there is, compared to Python, an extra compilation step in Rust.

In this article I'll show you how I have set it up ...

Note that I use Vim as my text editor and Mac as my operating system. I hope most of the setup is easily transferable to other text editors and operating systems. Or that at least it gets you thinking about how you can speed up your coding workflow. πŸ’‘

Install rust-analyzer

First, you need to install rust-analyzer. I did this with brew:

brew install rust-analyzer

Install ALE, the Asynchronous Lint Engine

I use Vundle as my Vim plugin manager so I added this plugin to my .vimrc:

Plugin 'dense-analysis/ale'

And installed it with:

:PluginInstall

Setup in .vimrc

I added the following code to my .vimrc. I learned I can use ALE for Python as well in one go :)

" ALE Configuration
" Enable ALE for Rust and Python
let g:ale_linters = {
    \   'rust': ['analyzer'],
    \   'python': ['pyflakes'],
    \}

" Only lint on save, not on text changed or insert leave
let g:ale_lint_on_text_changed = 'never'
let g:ale_lint_on_insert_leave = 0
let g:ale_lint_on_enter = 0
let g:ale_lint_on_save = 1

" Ensure rust-analyzer is installed and in your PATH
let g:ale_rust_analyzer_executable = 'rust-analyzer'
  1. The ale_linters variable is set to use rust-analyzer for Rust files and pyflakes for Python files. I installed pyflakes with pipx. By the way, this might become a replacement for the Python plugin I mentioned in the beginning, not sure yet ...

  2. The ale_lint_on_save variable is set to 1 to check the syntax on save.

  3. The ale_rust_analyzer_executable variable is set to rust-analyzer to ensure that rust-analyzer is installed and in your PATH.

  4. The ale_lint_on_text_changed, ale_lint_on_insert_leave, and ale_lint_on_enter variables are set to never, 0, and 0 respectively to prevent linting on text changed, insert leave, and enter. Tweak these settings as you see fit.

Playing around with this plugin I added some more settings to my .vimrc:

" Enable ALE's virtual text feature for inline messages
let g:ale_virtualtext_cursor = 1
let g:ale_virtualtext_prefix = '⚠ '

" Customize the ALE sign column for better readability
let g:ale_sign_error = '>>'
let g:ale_sign_warning = '--'

" Enable ALE to use the quickfix list
let g:ale_open_list = 1
let g:ale_set_quickfix = 1

" Enable line wrapping only in quickfix and loclist buffers
autocmd FileType qf setlocal wrap linebreak
autocmd FileType loclist setlocal wrap linebreak

" Enable ALE's floating window preview feature to show detailed error messages
let g:ale_detail_to_floating_preview = 1

See it in action

Here is some code to try this on:

mod data;

use tokio;
use crate::data::fetch_data;

#[tokio::main]
async fn main() {
    let data = fetch_data().await.unwrap();
    println!("{:#?}", data);
}

Let's make a couple of errors and see the ALE checker in action πŸ’‘ πŸš€

  1. changing mod data; to mod data
E mod data // E: Syntax Error: expected `;` or `{`
  1. data to data2 which is not defined
E     println!("{:#?}", data2); // E: cannot find value `data2` in this scope
  1. removing a use statement
W use tokio; // W: consider importing this function: `use crate::data::fetch_data; `
...
E     let data = fetch_data().await.unwrap(); // E: cannot find function `fetch_data` in this scope not found in this sc
  1. removing the #[tokio::main] attribute
W use tokio; // W: remove the whole `use` item
E async fn main() { // E: `main` function is not allowed to be `async` `main` function is not allowed to be `async`
  1. removing the async keyword
E fn main() { // E: the `async` keyword is missing from the function declaration

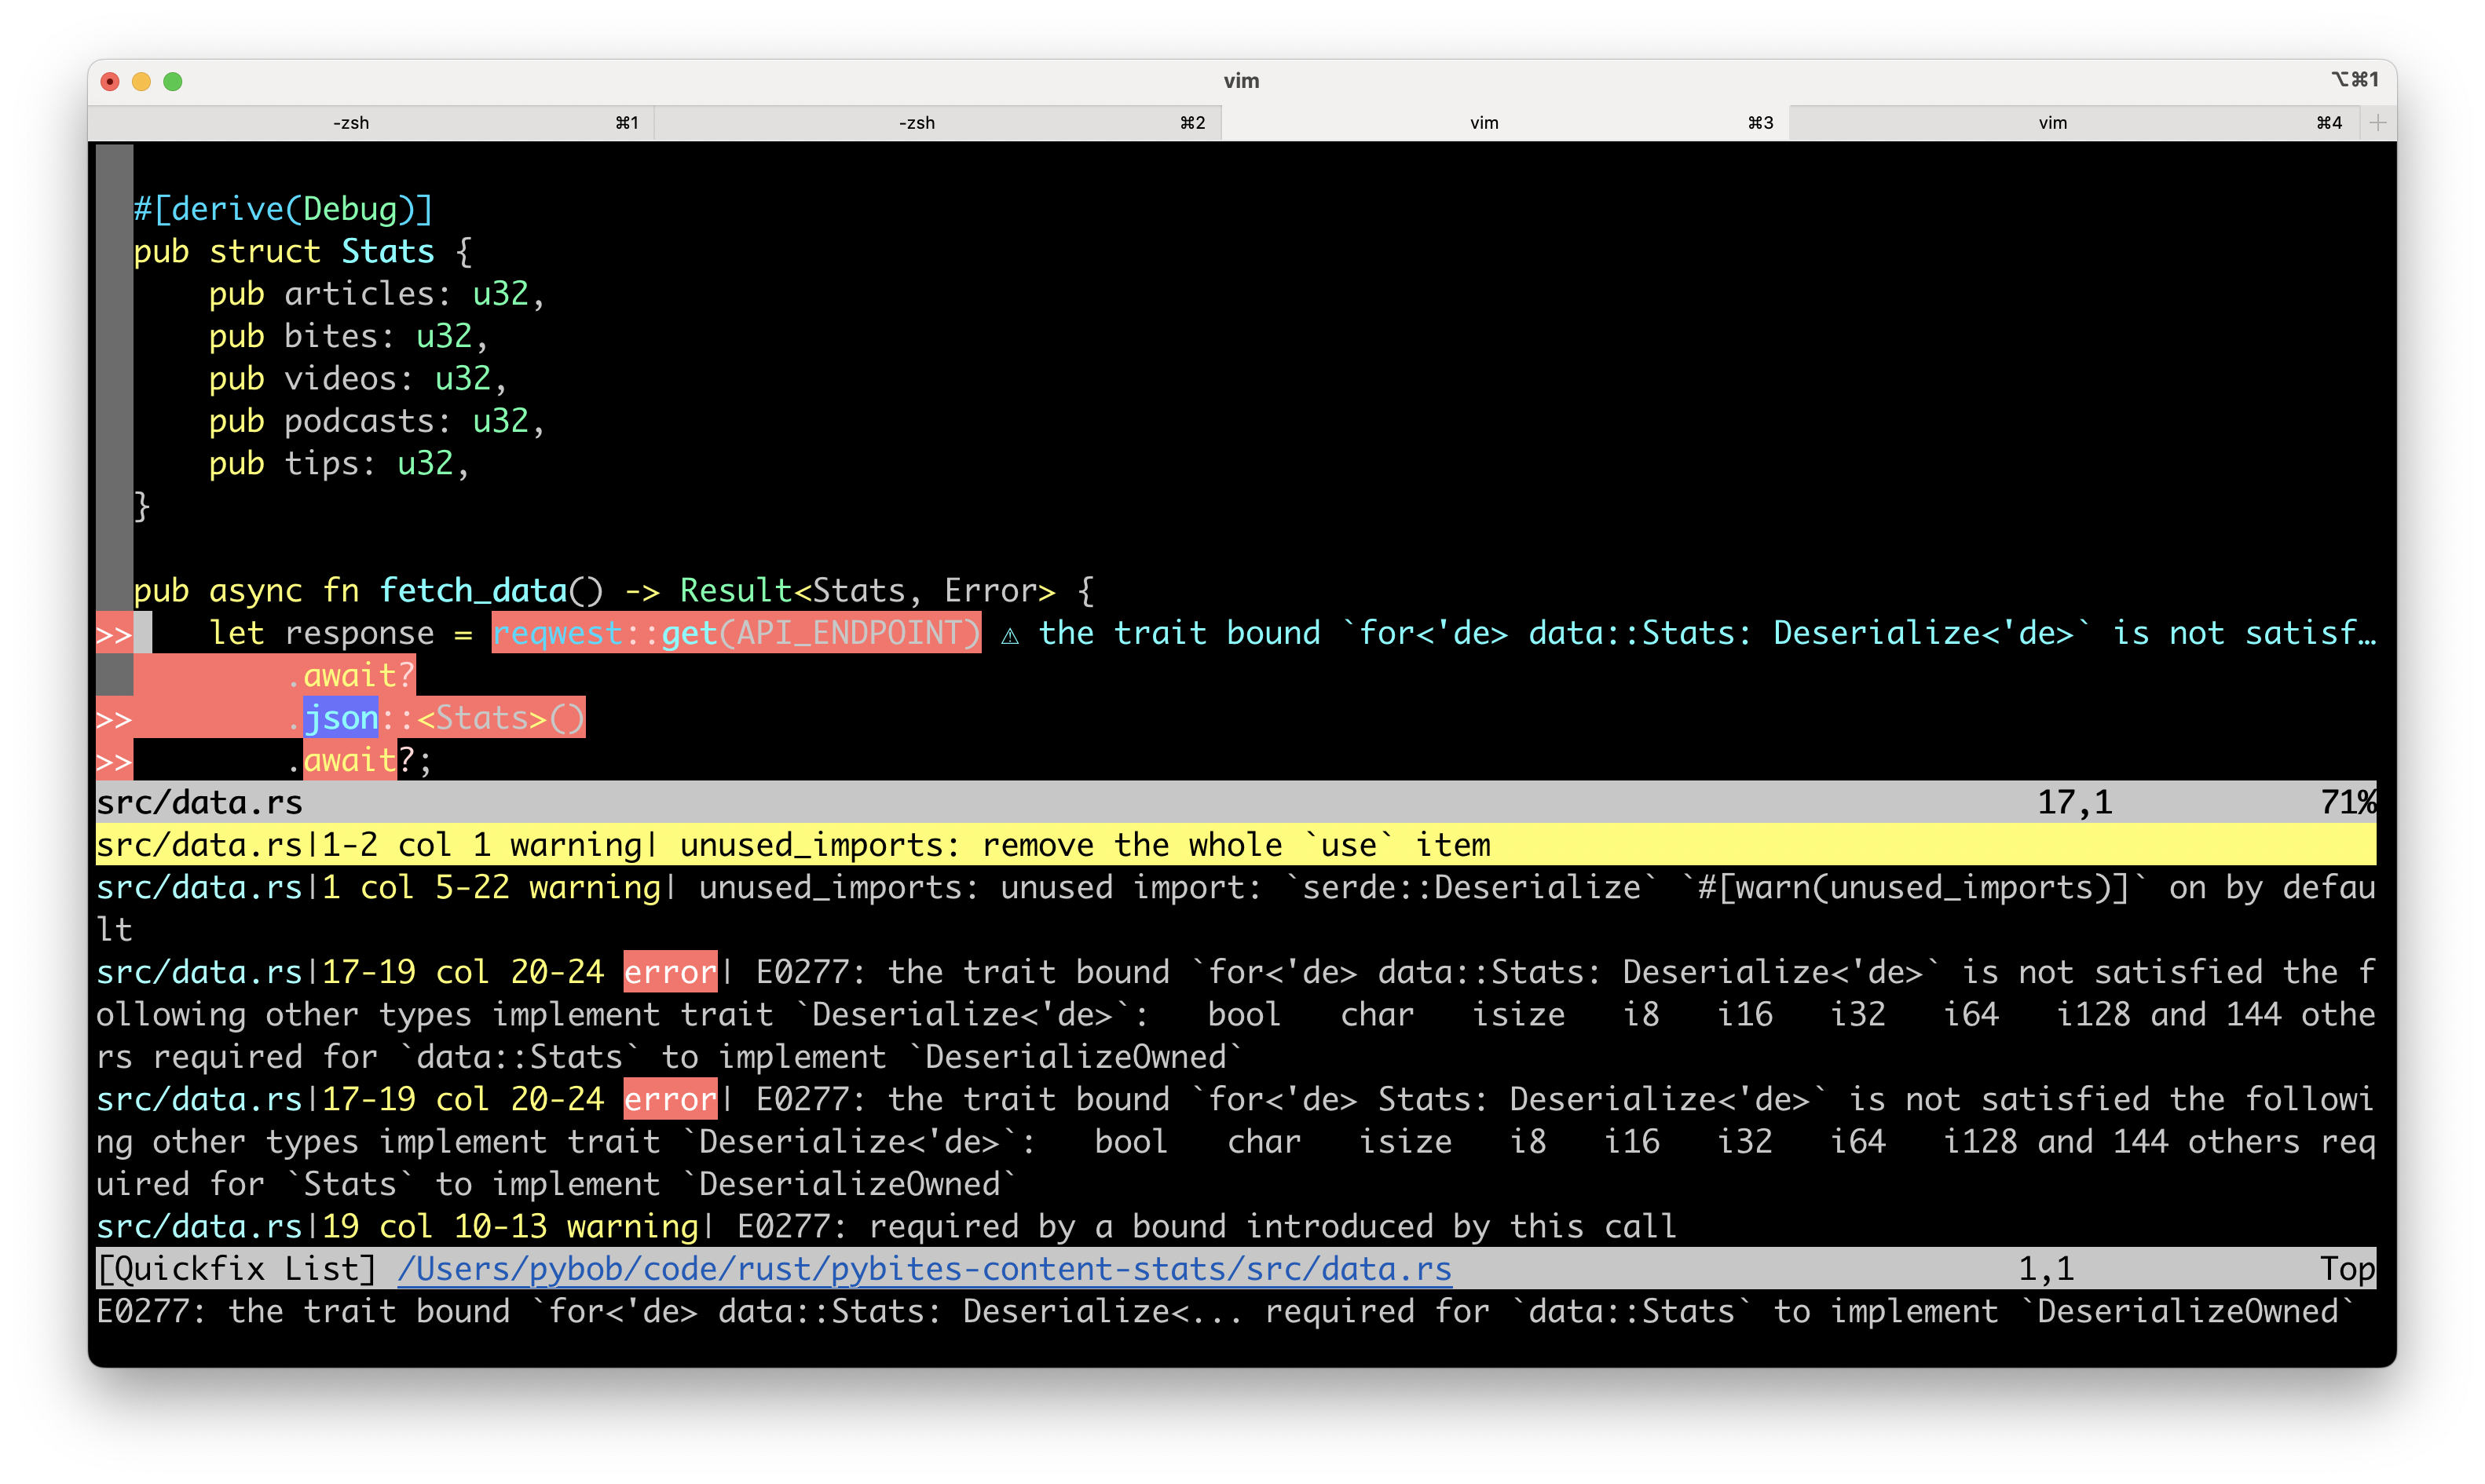
Specially the ale_open_list and ale_set_quickfix settings are useful. The quickfix panel shows all the errors in a separate window, which is useful when you have mulitple errors that wrap in the editor window. For example:

Example of ALE errors pane

And it also works for Python 😎 πŸŽ‰

...
E print(c) # E: undefined name 'c'

And:

E print(a # E: '(' was never closed

Complementing with GitHub Copilot

If an error is not 100% you can always add a "question comment" like this to get more suggestions. Here for example I purposely removed the await method from the fetch_data function:

...
async fn main() {
    E     let data = fetch_data().unwrap(); // E: no method named `unwrap` found for opaque type `impl Future<Output = Resul…
    println!("{:#?}", data);
}

# q: why does the above fail?

GitHub Copilot will suggest the following answer right below the question:

# a: the fetch_data function is async, so it returns a Future, not the data itself

This is a useful technique and faster, because I can stay in Vim rather than making the round trip to ChatGPT. πŸ€– πŸš€


Hope this helps you speed up your Rust coding! πŸ¦€

Either as a Vim user or not, you can use the same principle to speed up your coding in your favorite text editor.

Or at least get into the mindset of speeding up your coding through efficient tools and techniques. πŸ’ͺ πŸ“ˆ

If you want to learn more about my Vim setup overall, check out this video: Supercharge Your Vim Workflow: Essential Tips and Plugins for Efficiency. πŸŽ₯ πŸš€